Monday, October 25, 2010

Sherry's Coming this Saturday!


Boy does time fly!!! And so, this Saturday, October 30th, Sherry will be here again.

Here is just a sample of what you can make in either the Fall Cards or Christmas Cards class.

Oh, I just love the glitter on this first card!

And here's a really nice way of using the icicles border punch.

Isn't this just a perfect Thanksgiving Day card?

Hope you can join us! You'll be able to get lots of ideas for your holiday cards and, of course have lots of fun doing so!

See you soon,
Anna

Cutest Little Bundled up Girl


I got this cute Stampendous stamp set in last week and couldn't wait to use it.

I wanted to color her with my Copics and make a simple card. So, I picked a blue theme, colored her in and picked out matching paper. I decided to use the snowflakes embossing folder and ran the white glossy paper through it for my background. I then used the "Open Scalloped Square" European die and matted the girl onto it. I heat embossed the saying in white and thought it just needed a little something more. So I cut out a snowflake (also from the European snowflake die set), added a few white pearls and stickles of course! I have to say, it is soooo cute! I just LOVE it.

Thanks for stopping by,
Anna

Wednesday, October 20, 2010

Beautiful Wedding Invitation Set

Hello Everyone!

Nancy Wanser stopped by and gave me the wedding invitation and table settings she made fro her daughter's wedding last month. Everything was colored coordinated and it all came out beautiful. Both Julie and Nancy were very happy and they got lots of well deserved compliments!

This first picture is of the invitation, favor box, table number card and a place setting card.


Nancy and Julie came to the shop and looked through swatches of paper to come up with the color combination. She knew she wanted browns and coppers for her fall wedding.

And thankfully I was able to get them this pretty chocolate metallic finish cardstock as well as the copper metallic, both with a gorgeous shimmer to it.

Nancy came up with the wording and the font and brought it to her printer with all of the cardstock. He did the printing, as she did not want to sit and print all of them.

If you need a lot printed, this is a great way to go.........you can pick your paper and all, and have a printer just do the printing for a nominal fee. He also printed the envelopes and the RSVP envelopes........it was a great savings of time!

Now, when Nancy got the work back from the printer, she just stamped the corners with a pretty Hero Arts heart flourish, mounted it on the copper and added the Swarovski crystals.

Next she had to tape the pocket on the holder and then placed everything inside, and added a pretty punched heart to the closing tab. (These wedding invitation holders come cut and scored!!! Another beautiful and professional addition to the set)


Here is a close up of the pyramid favor box, again in the chocolate metallic cardstock, simply heat embossed in gold and tied with a pretty gold cord.

Now, when Ceci cuts these boxes for you, you have a lot of scraps............and you USE them.

Nancy, punched out the table numbers in two sizes - large for the table card and then the small one for the place setting card.

These are some of the great ideas you can get at the Creative Corner for your next big event. Don't be afraid to stop by and get inspiration from our team. Don't forget, two or more heads are better than one. We are always ready to help.

Tuesday, October 19, 2010

"A Very Merry Christmas" Card


While I was in Canada, I saw a beautiful card made by Nancy, of Ecstasy Crafts, and here is my take on it.

I just loved the color combination and the simplicity of the flowers.

The window was cut with one of the European nested labels die, the flowers were the daisies die set and the swirls were from another set. I used an embossing folder to get the textured dots on the card and I stamped and heat embossed the saying on the inside label. Stickles were added for the finishing touch.

Just think, stamp the appropriate saying you need, and you can use this card for ANY occasion.

Stop by this Thursday (Demo Evening) or Saturday for Demo Day and see how easy it is to use dies to make this card. You can also substitute the new embossing flower punches and get the same look. Hope to see you!

Hazel, the Witch Owl


Hi Everyone,
Today I wanted to put together a Halloween card with the ever so cute, Hazel, the witch owl from A Muse. I also challenged myself to use two different cutting dies, but from totally different sets.

I have to say, I'm very pleased with the outcome. I colored Hazel with Copics and then cut her out with the Classic Scalloped Circles from Spellbinders. I then layered her on an Opened Scalloped Square cut from the European dies. I then ran it through the Big Shot in an embossing folder to get more texture. I also used the same folder for the white background that everything was layered on.

It was fun getting so much texture on the card as well as using different die sets. I know that we tend to always use dies that nest, but as you can see, you can get a whole new look by mixing up the dies. Try it yourself, I think you'll be surprised and like the new looks.

P.S. I just realized that I actually used 3 different die sets. The tag that was stamped with "Wicked" came from the Open Scalloped European rectangle set. So, there you go, 3 different sets. See how many sets you can use in a card.

Thursday, October 14, 2010

Tim Holtz Roses Class


This past Saturday, Barbara Thomas taught the Tim Holtz Roses Technique again and here are some of the completed frames. The ladies did a great job! They are just wonderful.....and each one turned out different, showing a personality of their own.

The first one was made by Maryanne Sullivan and.......

Nina made this very pretty one. No one would believe that Nina is not a stamper nor has she worked with distressed inks! You go girl!!!


Here's our Ceci working hard to distress her frame.

And here are Maryanne and Nina admiring each others work.

Thanks ladies for a fun day with distress inks and thanks Barbara for another wonderful class!

Love Those 3-D Pop ups

Hi Everyone,

Here are two examples of cards made with 3-D Pop-ups.

This one with the candles is so stunning. Unfortunately, you can't see the glitter, which really makes it pop!


And I really love these old fashioned girls..........they are just precious. Here, too, they look so much better in real life.

Stop by and see how easy it is to make these spectacular cards!

Thanks,
Anna

Thursday, October 7, 2010

Transfer Technique of all the Parts of a Peel Off Design

Many of you have asked that I do a Demo showing you how to get all of the pieces of a peel off design/image transferred to a card.

I had to do the demo in two parts......and here's the first segment.


Please see the next post below for the continuation of the demo.

Transfer Technique Demo, Part Two

Here is the completion of the demo.


Peel offs are a fun and easy way to add greetings to your cards as well as borders and complete images. Hope you'll try it and see for yourself how easy it really is!

Thanks for watching,
Anna

Monday, October 4, 2010

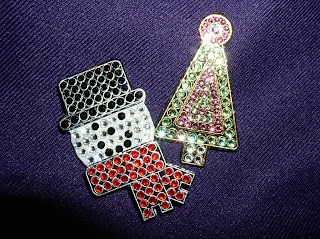
New Outlines Christmas Pins


Wow, don't these pins sparkle?

These pins were made with the latest stamps from Outlines and I used lots and lots of Swarovski crystals to make them sparkle! (There are more than 100 crystals on the snowman!)

These will look great on your winter coat or better yet, give them as a gift to that special someone! Join the class on Thurs, Oct 7 and make the Snowman pin, with a very special gift box and card. You'll then be able to mark a gift off your Christmas list ! Now, won't that be just dandy!

We're back from Canada

Hi Everyone,

Soni and I are back from a great and very productive trip to Canada. Here are the samples we made from the new product. We got to play with the new "poinsettia" punches that also emboss and we used metallic paper. (The green card with the windows above) We also did some Pergamano and spirelli. And don't forget the new peel offs and clear glitter stickers.


The new embossing folders were terrific. Here, we used the Christmas ornaments embossing folder to make the 2 ornament cards above.

You will be glad to know that the new product (embossing punches, cutting & embossing dies, peel offs, 3-D pop ups, metallic papers,, and more) will be arriving this week, just in time for you to begin your holiday projects! Come in on Saturday, (Oct 9), any time after 11AM, for Show and Tell! Get to see the cards up close and personal as well as all of the new product and do a Make and Take!!! You won't be disappointed!