Monday, December 31, 2012

Sweet Treats for a Happy New Year!

Hi Everyone!  Hope you had a very Merry Christmas.......I had a wonderful time in Virginia visiting Maria and Gary. 

First I want to show you some treat bags I made using the great Fawn Lawn stamp set Making Frosty Friends.  (Remember, I made a cute card with this stamp set, see it HERE). 

 They came out so cute and they were quick to make.  Just some coloring with Copics, some basic masking, and then just attached it to a decorative square die.

This is a close up of the snow people.

Now, for some fun stuff;  I want to show you some pictures from my trip.  On Christmas Eve, besides going to church, we went to Mount Vernon, George Washington's  Estate, Museum and Gardens.


Here's hoping you are enjoying this time with family and friends.
Stay warm, be safe and have a Happy and Healthy New Year!
               ~Anna

Wednesday, December 12, 2012

Cute Christmas House

I came across so many cute "house" cards this year!  And Kittie Caracciolo has made some fabulous ones.  Check out her blog HERE.  I loved all of her "house" cards, but especially the red plaid Christmas house one.  I basically copied the design because it was sooooo cute!

The door, window and fence dies are from Impression Obsession.  Kittie also used the I/O scalloped border die; I instead used a Nellie's Multi frame die.  I know that many of you already have this older die and can use it here.  It is always nice to be able to use your stash as opposed to always buying new ones.  In this economy we all need to get the best bang for our buck!

Hope you had a wonderful special day!
            ~Anna

Thursday, November 29, 2012

Reschedule of Christmas Open House

PLEASE NOTE:   We need to reschedule the Christmas Open House to Saturday, Dec 8

I am actually in bed right now with the flu and stomach bug and think it's best not to share it with you. (Plus it will give me the time to get well)

Looking forward to seeing you on the 8th..........see the cute Make and Take I have in store for you!
See you soon,
    ~Anna

Sunday, November 25, 2012

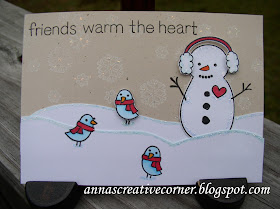
Cute Snowman Make & Take for Saturday!

Hello Everyone!!!
Isn't this card just too cute?

Join us this Saturday, December 1, for our Annual Christmas Open House and you too can create this great card! 

It's made with a new company, Lawn Fawn and they have so  many cute sets!  Their blog has loads of ideas.  Check them out HERE.  You can create some quick and simple cards with these stamps and have lots of fun at the same time!

I had so much fun making this card.........the set includes lots of elements to personalize your snowman!  Just check out the stamp set!.  It reminded me of the build a flower die sets, only I was building a snowman!


I'll be looking forward to seeing you at the Open House...........where we'll have refreshments, Make & Takes, specials and just good old fashioned Christmas cheer!

        ~Anna

Saturday, November 24, 2012

Pretty Thanksgiving Day Card from Soni Larson

Hope you had a very nice Thanksgiving!  I had a very lovely one and Soni presented me with this very pretty card.

She used the great leaf set from JustRite Stamps and distress inks to color them.  The layout is so clean and simple, yet very elegant!

Hope you are enjoying the weekend and remember to support your favorite small businesses today, on Shop Small Day!
      ~Anna

Saturday, November 17, 2012

Thanksgiving is almost here!

Thanksgiving is almost here and I have to say that I am very pleased with my new card.


I just love the beautiful die from Marianne called Anja's Large Oval, LR0236.  I love the shape and the lattice. The die cut so easily; no problems there!

The fall flowers were made with the Cheery Lynn Build a Flower set #1 and the leaves were made with Cheery Lynn, Olive Branches and Mini Fanciful Flourish

The finishing touches were added with a bronze pearl pen from Viva Decor.

 Here, you can see all of the different parts of the Anja's Large Oval die..............simply gorgeous.........and with so many possibilities.

Just imagine using the same lay out and just changing the colors to Christmas red and green!  (You can use these flowers or poinsettias.)  It would make a stunning Christmas card!!!  I'm going to have to try it myself!

Call and let me know if you would like any of these dies!  They are going like hot cakes now, especially ever since the sample was seen in real life!

Thanks for "stamping" by,
       ~Anna

Friday, November 16, 2012

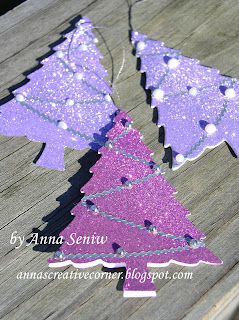
Lavender Christmas Trees!

Yes, I said lavender and don't they just great; all sparkly and waiting to be attached to your gifts or hung on a tree?


Christmas tags do not always have to be traditional colors.  Try something different and have some fun!  We have lots of Elizabeth Crafts glitter available in all sorts of colors for you to try your hand at this!

Stop by and pick yours up today!
           ~Anna

Wednesday, November 14, 2012

White on White Christmas with a bit of Color

Hello Everyone!
Sorry I haven't been posting............yet so glad to be back!  We lost power here for a week because of Hurricane Sandy and even though it was rough, I'm so grateful that was all I really had to deal with.  So many people lost everything and were without power for so much longer.  Thankfully, things are getting back to normal and today I got to take pictures of some projects that I had wanted to post.

As you know I love the color scheme of white on white with a bit of color and I came up with this new card using Dee's Christmas tree die and Marianne's reindeer.  In addition, I used Nellie Snellen's pine punch and red stickles for the top of the tree and "Rudolph's" nose!


I hope this picture shows you the texture from the embossing folders.  I even ripped the card stock with the swiss dots to make two snow banks.


 And here, you can see the dimension with the layering I did with the fancy and the solid trees.


Thanks for "stamping" by and stay tuned for my next post.  Surprisingly, it will be of lavender Christmas trees!
     ~Anna

Wednesday, October 17, 2012

Great Christmas Tags

Thought I'd get you into the Christmas mood with these great tags.  They were fun to make and will make your gift truly stand out!

Here, I used Stacy Stamps, Mini Poinsettia and attached it to the middle of a JustRite Christmas Ornament stamp. The poinsettia was colored with Copics and the ornaments were cut out using Spellbinders 2010 Heirloom Ornament dies.  To make it all sparkle, I used stickles!

For the next tag, I used JustRite, O Christmas Tree stamp set.  I also stamped the Holly Background with Hero Arts and then used the matching embossing folder to give it lots of dimension.  This is a wonderful set from Hero Arts and Sizzix!
I also saw somewhere that someone had used a part of a rosette and so I tried it here, using one of the smaller rosette's from Tim Holtz.  Also used lots of stickles and Elizabeth Crafts, Canadian Blue micro fine glitter for the finishing touches!

For the third tag, I used Dee's Candle die (from Elizabeth Crafts), the pine punch from Nellie Snellen and Spellbinders Large Ovals. 
Of course, stickles was added to the pine branches and the flame.  It's a simple design yet impressive.

Hope this gives you some ideas for the upcoming holidays and get you started on your projects.  Christmas will be here before you know it!

Thanks for stopping by,
       ~Anna

Friday, October 5, 2012

Upcoming Great Classes with Jan Randolph

I am happy to announce the following great classes with Jan Randolph.

First, Colors of Distress Inks, a great introduction to distress inks where you will learn several techniques in how to use these inks and ink pads.  And here is a sample of the cards you will make in this class.  It will be offered twice:  Friday, October 12 at 1PM and on Saturday, October 20 at 11AM.


In November, Jan will have a fabulous class, Fun with Acetate and create the cards below:


Here you will make beautiful backgrounds with inks and Impression Obsession stamps and then stamp the acetate and put the card together.  These cards of course look so much better in real life!  Believe me, you will not be disappointed!  And as a bonus, you'll even create a tag!!!  This class will be offered on Friday, November 16 at 1PM and on Saturday, November 17 at 11AM.

And in December, you'll still get a chance to join Jan and make Christmas cards!  These cards are made with Impression Obsession background stamps and are quick and easy, yet very pretty!!!

Sign up today for Saturday, December 8 at 11AM.  Perfect time for those last minute Christmas cards!

(Remember, you can click on any picture and see an enlarged version.)

Looking forward to hearing from you soon,
                 ~Anna

Saturday, September 29, 2012

Christmas Martini

I fell in love with this Impression Obsession stamp, Christmas Martini ever since I saw Jenny Gropp's card last year.  Therefore, this year I couldn't wait to get the stamp and use it!

Here is Jenny's card.........isn't it fun!  And check out her blog for a list of Copics that she used.


I started coloring some martinis and thought, wouldn't it be fun to make martinis for different holidays throughout the year?  Change up the colors, cover up the holly,  change the layout and you could be in martinis for a very long time!  (Hmm, not a bad thing!)

So, for Halloween, here is my fun card:

(Don't know if you can see in the photo, but I used glossy accents to make the glass shiny.)

And for fall, I made this card:

I used my tiny floral and leaf punches to cover up the holly.  I added some distress stickles to the centers of the flowers as well as the center of the candy.

I already colored "Lemon drop" martinis and will post that card as soon as I put it together.

Really, you have to try this.........it is so much fun!!!  Just coloring and thinking up different drinks!!! 

Here's the stamp that started it all:


 One little stamp, sooooo many drinks!!! 

Would love to see what you come up with!

Thanks for "stamping" by,
        ~Anna

Wednesday, September 19, 2012

Another Look at Christmas Ornament Dies!

Here's another GREAT example of using your Christmas ornament dies in a non-traditional way.
Soni Larson made this stunning card using the 2012 and 2011 Spellbinders Heirloom Ornament dies.  Doesn't this make a wonderful Thanksgiving Day card?


Soni also used Dee's Large Fern die (from Elizabeth Crafts) and Marianne's Creatables LR0157, all of which you can get here at the Creative Corner.

    Enjoy your day
             and
Thanks for "stamping" by,
         ~Anna

Wednesday, September 12, 2012

Learn How to Stretch Your Stamps at Crafty Me Day

Join us this Saturday for Crafty Me Day and get some great tips on how to "stretch" the use of your stamps and dies!

First we'll create the flower vases from the Christmas Ornament dies.  See the sample HERE.

Now, remember this Impression Obsession stamp?


It was very popular a few summers ago and we loved coloring it in with bright summer colors.  We even added these "glass shards" over the candy which made it look like the real hard rock candy.

By changing up the colors, you can use this stamp for Halloween or Christmas!

 Let your imagination go.........the possibilities are endless!

Looking forward to seeing you Saturday,
                          ~Anna


Friday, September 7, 2012

Look What You Can Make with Your Xmas Ornament Dies!

I just love it when you can use your supplies in different and nontraditional ways!  Soni told me about an idea she saw on line and I just had to try it.  I used the 2012 Spellbinders Heirloom Ornaments dies to create vases!  Yes, you heard right.......vases!


I really only used the top part of the ornament dies.  I then just added those wonderful punches from Nellie Snellen that also emboss the shapes.

2012 Heirloom Ornaments
***(These new ornament dies are in stock now!  Get yours today!)***

This was a such hit on Make and Take Day this past Labor Day weekend.  Therefore, we will repeat it for Crafty Me Day, on Saturday, September 15th!  Come and get more ideas about how to stretch the use of your dies!


Thanks for "stamping" by,
           ~Anna

Friday, August 24, 2012

Beautiful Wedding Card using Outlines Stamp

I wanted to share with you this beautiful card that Ginny made some time ago.  It is still as stunning as when I saw it that day!

Ginny used the wonderful Outlines stamp and dressed it up with beautiful textured card stock, flowers, flat pearls, and glitter!  Isn't it simply gorgeous?

This is the stamp she used and presently there are still two of these in stock at the Creative Corner.  Pick it up now, because once they are gone, they will be gone for good!  (Outlines is no longer in business)


And this stamp is still in stock and would make another lovely wedding card!

Have a wonderful day
         and
   See you soon,
       ~Anna


Wednesday, August 22, 2012

Happy Engagement Card!

I have been bursting with news and now I can finally post it!!!  My daughter, Maria and her boyfriend Gary are now engaged!!!  I'm so happy for them.

About two weeks ago, Gary called me and asked for my blessing.  And of course I said yes.  "My goodness", I said, "I consider you my son already!"  

I then asked for some details and he told me that he was planning to pop the question when they would be vacationing at Myrtle Beach.  I asked about the ring and he explained that he got it already, all by himself.  He knew Maria wanted an emerald cut diamond; therefore he chose two smaller stones surrounding the main one.  I right away had to think of a card design.  I remembered that a long time ago I saved a sample of an engagement ring card from the internet, in the hopes that one day, I could make one for her!.......................And here is what I came up with.

 It would have been easier to create a round solitaire stone, but as usual, Maria likes to be different, and I had to improvise. 

Below you can see the different parts of the round solitaire ring.  I used Spellbinders Classic Circles Nestabilities to create the ring and then just cut some strips to the setting.  Lastly, I used the silver, Elizabeth Crafts micro fine glitter for the stone.  It really sparkles!

 
 I saved this before the days of Pinterest, so I don't know who originally posted this.  But this shows you how simple it is to create a ring!

Now, Shannon saw the card and suggested that you can use this design for someone's birthday and make the stone the color of the birth month.  She is thinking of using ruby glitter to make a nice ruby ring!  What a great idea!

Now the wedding plans can begin!.........I found this on Pinterest.............and I asked Maria if I should start making these?   You know me, I would need to decorate it.......maybe some hand made paper flowers for Mrs. Right and some golf clubs and tee flags for Mr. Right.  Don't you think it would be just perfect???????

Thanks so much for "stamping" by,
                ~Anna  

Monday, August 13, 2012

Watercolor with Stacy Rich

Hello Everyone,
Stacy Rich, owner of StacyStamps just sent me some samples of the cards that you can make this Saturday, August 18 during "Watercolor" day!

In the 10AM class, you will practice the watercolor technique and complete 4 cards!  Here are three of the cards you will make.


In the afternoon class, you will make a wonderful 8X10 watercolor picture, ready for framing.  (Stacy is even bringing the mats!)  And here is the sample creation:


Don't worry, you still have a chance to join us Saturday!!!  There is ONE seat available for the card class and TWO seats available in the afternoon class.  Call and reserve your seat today!

Thanks and
See you soon!
    ~Anna

Tuesday, August 7, 2012

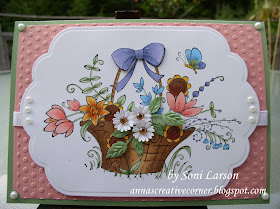
Pretty Outlines Flower Basket

Here is another example of stretching the use of your stamps!  Soni made this gorgeous card using the Outlines stamp, Spring Basket.  It really is an image of an Easter basket with Easter eggs, but if you cover the Easter eggs, you just have a wonderful basket full of flowers perfect for spring, summer and even fall (if you choose fall colors for the card)!

This colorful card is great for so many happy occasions.

Here, you see the actual image with the Easter eggs in the center; where Soni covered the eggs with flower and leaf punches.  Not only did the flowers and leaves cover up the eggs, it also gave it more depth.

We still have this and several Outlines stamps in stock.  Now is the time to get your Outlines stamps!   Outlines has closed their doors and once these stamps are gone, they will be gone for good!  Stop by and pick yours up today!

Have a wonderful summer day!
            ~Anna

Thursday, August 2, 2012

Great Time at Anniversary Celebration

Thanks to everyone who came and celebrated with us my 8th Anniversary this past Saturday!  You helped make it a success! 

Fun was had by all..........good food, friends and stamping!  What more could we have asked for?


And 7 year old Katelynn was right in the groove!  Doesn't her tag look great?  Wonder what stamping and crafting will look like in the near future when this young generation really gets into it?!!!

Thank you again for your support!
              ~Anna

Thursday, July 26, 2012

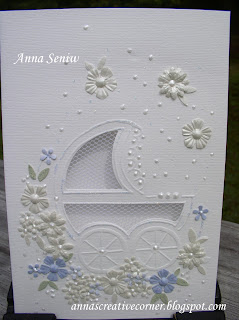
Welcome a Baby Boy with this Pretty Baby Carriage Card

I am finding it so relaxing and creative to decorate these new "Pontura" cards.  I start by surrounding myself with  these little piles of  flowers and leaves that I have punched out in all sorts of colors.  I then totally immerse myself into these miniature gardens with just my tweezers, stylus and glue and watch as the carpet of flowers grows.  I can't stop until all of the flowers are glued down and the pearls and glitter are added. 

 Again, I used the same punches as I did in the bridal card.  You can see a list of  them HERE


This is a close up of the fine detail of the design.

You really have to try these out..........they make such elegant cards!!!

Thanks for 'stamping" by,
         ~Anna

Thursday, July 19, 2012

Stretch the Use of Your Dies

I love it when you can use your tools and stamps more than one way!  Here is a very creative example of how Dina Kowal, Impression Obsession's Design Team Member used the popular fence die from I/O in non traditional ways!

First, she turned the fence upside down.   This gives you a plain picket fence as opposed to the fancy one seen below:

Next she made the flowers for the tree by using the top pickets of the fence and rolled it around a small stylus.  Check out her tutorial HERE!

I also love how Dina used the negative of the tree die!  Simply gorgeous!!! 

Start looking at your dies differently. 
I just thought of something you can try ----- place the fence on it's side and weave ribbon through it.  It will make a great embellishment for you work.

Why not post a comment telling us your fabulous idea, or post a picture of your card on our Facebook page?  All of us would love to hear from you!

And just to let you know........the fence and tree dies are in stock!  Let me know if you want one!!!

Thanks for "stamping" by,
          ~Anna