It's that special time of the year........and so here is a message from me and some of the many elves at The Creative Corner!
Thank you so much for your friendship and support throughout the year! You are all so special!
Have a happy holiday and I'm looking forward to seeing everyone in the New Year, at The Creative Corner's new home in Glen Spey!
Take care,
Anna

Wednesday, December 22, 2010
Tuesday, December 7, 2010
Simple Elegance

I'm always checking blogs and websites for ideas, and I came across one card where the artist used this large Hero Arts flower and only colored certain stripes red. Here is my take on that flower; I colored the stripes with Copics, R29 and layered it on glossy cardstock that was passed through the Big Shot with the swiss dots embossing folder. I left part of the paper not embossed, and just flat with double lines above and below, so that I could stamp the saying.
Remember, adjust how you place your card stock in the embossing folder. You do not need to emboss the entire piece of paper; some parts can be left un-embossed for a different effect.
Friday, December 3, 2010
Dashing through the Snow!

Thankfully, you will not have to be dashing through the snow tomorrow in order to get to the Christmas Open House. It's going to be sunny, but a bit cold...........so, come in and join the fun!
Wednesday, December 1, 2010
Happy December!

Hi Everyone!
Here's a simple but very pretty Christmas tag for your gifts. You only need the Christmas tree die from Joy. And the star also comes in the set.
Thanks for stopping by,
Anna
Wednesday, November 17, 2010
We Made the News!!!

Yes, we made it into the Sullivan County Democrat!!!
Yesterday's issue included the following article:

Well, I guess the whole county now knows that we don't just rubber stamp!
Tuesday, November 16, 2010
Pretty Additions for your Thanksgiving Day Table

Here are two simple additions you can make for your Thanksgiving Day table. I used pre-printed Memory Box paper, an embossing folder and some Nestabilities and made a place setting card and a favor bag to hold chocolates. I just added stamped images from A Muse, colored them with Copics, used antique linen distress ink over them and put it all together.
Join us in class on Thursday, Nov. 18 and you can have these and a decorated candle for your "turkey" table. Won't your guests be surprised with these special touches waiting for them at their place setting.
Sunday, November 14, 2010
We Launched Our New Website
I was so very pleased that we launched our new, totally revamped website. Please check it out; the new calendar is easier to read, there is a link to press articles and there even is a new "Post it" on the home page for the latest reminder. Olga of Aglo Creations did a wonderful job and she is still working on a few more new things for us in the near future.
Thanks so much for stopping by,
Anna
Thanks so much for stopping by,
Anna
Wednesday, November 10, 2010
Happy Thanksgiving Day Card

I just love the "Pumpkin truck" from A Muse Stamps and today I got to complete a card with it.
I wanted to do a simple and quick card, so I stamped it and colored it with Copics. I cut it out with the Spellbinders Nestabilites. I then used some distress inks (antique linen) to make it look "old". I stamped the saying and then ran the card stock in an embossing folder.

Now, don't forget to decorate the inside.
I stamped the sayings from Stampendous and then wanted to add some color. So I took out my Rubber Stamp Tapestry stamps (yes, haven't used them in a long time) and stamped around the sayings.
Think about how you can decorate the insides of your cards.
Thanks for stopping by,
Anna
Distressed X-mas Tag

Hi Everyone, Just wanted to post the picture of the distressed Christmas tag that the ladies got to make last Saturday. Barbara had them use the new distress ink colors, Stacy's sleigh stamp and pine tress, and they even colored the ribbon with the distress inks. it was quick and easy, but very dramatic.
Thanks for stopping by,
Anna
Anna
Monday, November 8, 2010
Poinsettia Christmas Card

Here's a card we made in class using Stacy's poinsettias. Those poinsettias are so sweet.
I colored them with Copics and layered them on this very pretty, gold mirrored card stock. (This card stock is available at the shop, as well as mirrored silver paper with snowflakes.) I also used the Spellbinders Nestabilities in the classic circles and scalloped circles. And the border is also Spellbinders.
Hope you are finding some time to work on your Christmas cards.
Thanks and Happy Stamping,
Anna
There was NO STRESS in the Distress Class

This past Saturday Barbara and I taught the "To Distress or Not to Distress" class and we all had a blast laughing all the way through class! True, the ladies looked very serious here; concentrating on their work. But once we started rolling, we were even singing to the music that was playing and getting lots of cards and tags done. (Click here to see some of the cards they made.)

Here is one of the non-distressed tags. We used a beautiful snowy scene from Stampendous and lots and lots of glitter.

This tag was also non-distressed, with an A Muse saying and an A Muse tiny Santa hat. The tag was cut with the nesting European dies. The poinsettia was punched and then embossed with the special punch set.
Please check the blog tomorrow for the picture of the distressed tag. (Unfortunately, I forgot to bring the tag home to scan.)
Thanks for stopping by and see you tomorrow,
Anna
Tuesday, November 2, 2010
Oh My Gosh, It's November Already!

This past Saturday, Sherry Czarnecki, A Muse Art Stamps Instructor, visited The Creative Corner again and held 2 classes.
Here, we have some of the ladies working on their fall cards. Most of the techniques were easy, but the results were stunning.

These are the completed cards; everyone was very pleased with their results.

And while we were working, there was a "Pet Halloween Parade" in town! Unfortunately, Maryanne couldn't be in two places, so she stopped by to show us her entry. And I just loved it --- Rich Witch with her Super Dog!!!

And no class is complete without the chocolate treats!!! This time, Hazel the Witch was used to decorate the treat bags !

Lastly, here are the completed cards from the Christmas class. Lots and lots of glitter was used!!! Believe me, it's still all over the store, and I love it. The table and the floor is just sparkling in the sunlight!
Thanks to all who came out and stamped the day away. It was lots of fun and great therapy for all!
And thanks Sherry for another fun day of stamping. Looking forward to seeing you again in the spring! (Oh my gosh --- did I say spring?!?)
Monday, October 25, 2010
Sherry's Coming this Saturday!

Boy does time fly!!! And so, this Saturday, October 30th, Sherry will be here again.
Here is just a sample of what you can make in either the Fall Cards or Christmas Cards class.
Oh, I just love the glitter on this first card!
 And here's a really nice way of using the icicles border punch.
 Isn't this just a perfect Thanksgiving Day card?
Hope you can join us! You'll be able to get lots of ideas for your holiday cards and, of course have lots of fun doing so!
See you soon,
Anna
Cutest Little Bundled up Girl

I got this cute Stampendous stamp set in last week and couldn't wait to use it.
I wanted to color her with my Copics and make a simple card. So, I picked a blue theme, colored her in and picked out matching paper. I decided to use the snowflakes embossing folder and ran the white glossy paper through it for my background. I then used the "Open Scalloped Square" European die and matted the girl onto it. I heat embossed the saying in white and thought it just needed a little something more. So I cut out a snowflake (also from the European snowflake die set), added a few white pearls and stickles of course! I have to say, it is soooo cute! I just LOVE it.
Thanks for stopping by,
Anna
Wednesday, October 20, 2010
Beautiful Wedding Invitation Set
 Hello Everyone!
Nancy Wanser stopped by and gave me the wedding invitation and table settings she made fro her daughter's wedding last month. Everything was colored coordinated and it all came out beautiful. Both Julie and Nancy were very happy and they got lots of well deserved compliments!
This first picture is of the invitation, favor box, table number card and a place setting card.
 Nancy and Julie came to the shop and looked through swatches of paper to come up with the color combination. She knew she wanted browns and coppers for her fall wedding.
And thankfully I was able to get them this pretty chocolate metallic finish cardstock as well as the copper metallic, both with a gorgeous shimmer to it.
Nancy came up with the wording and the font and brought it to her printer with all of the cardstock. He did the printing, as she did not want to sit and print all of them.
If you need a lot printed, this is a great way to go.........you can pick your paper and all, and have a printer just do the printing for a nominal fee. He also printed the envelopes and the RSVP envelopes........it was a great savings of time!
Now, when Nancy got the work back from the printer, she just stamped the corners with a pretty Hero Arts heart flourish, mounted it on the copper and added the Swarovski crystals.
Next she had to tape the pocket on the holder and then placed everything inside, and added a pretty punched heart to the closing tab. (These wedding invitation holders come cut and scored!!! Another beautiful and professional addition to the set)

Here is a close up of the pyramid favor box, again in the chocolate metallic cardstock, simply heat embossed in gold and tied with a pretty gold cord.
Now, when Ceci cuts these boxes for you, you have a lot of scraps............and you USE them.
Nancy, punched out the table numbers in two sizes - large for the table card and then the small one for the place setting card.
These are some of the great ideas you can get at the Creative Corner for your next big event. Don't be afraid to stop by and get inspiration from our team. Don't forget, two or more heads are better than one. We are always ready to help.
Tuesday, October 19, 2010
"A Very Merry Christmas" Card

While I was in Canada, I saw a beautiful card made by Nancy, of Ecstasy Crafts, and here is my take on it.
I just loved the color combination and the simplicity of the flowers.
The window was cut with one of the European nested labels die, the flowers were the daisies die set and the swirls were from another set. I used an embossing folder to get the textured dots on the card and I stamped and heat embossed the saying on the inside label. Stickles were added for the finishing touch.
Just think, stamp the appropriate saying you need, and you can use this card for ANY occasion.
Stop by this Thursday (Demo Evening) or Saturday for Demo Day and see how easy it is to use dies to make this card. You can also substitute the new embossing flower punches and get the same look. Hope to see you!
Hazel, the Witch Owl

Hi Everyone,
Today I wanted to put together a Halloween card with the ever so cute, Hazel, the witch owl from A Muse. I also challenged myself to use two different cutting dies, but from totally different sets.
I have to say, I'm very pleased with the outcome. I colored Hazel with Copics and then cut her out with the Classic Scalloped Circles from Spellbinders. I then layered her on an Opened Scalloped Square cut from the European dies. I then ran it through the Big Shot in an embossing folder to get more texture. I also used the same folder for the white background that everything was layered on.
It was fun getting so much texture on the card as well as using different die sets. I know that we tend to always use dies that nest, but as you can see, you can get a whole new look by mixing up the dies. Try it yourself, I think you'll be surprised and like the new looks.
P.S. I just realized that I actually used 3 different die sets. The tag that was stamped with "Wicked" came from the Open Scalloped European rectangle set. So, there you go, 3 different sets. See how many sets you can use in a card.
Thursday, October 14, 2010
Tim Holtz Roses Class

This past Saturday, Barbara Thomas taught the Tim Holtz Roses Technique again and here are some of the completed frames. The ladies did a great job! They are just wonderful.....and each one turned out different, showing a personality of their own.
The first one was made by Maryanne Sullivan and.......
 Nina made this very pretty one. No one would believe that Nina is not a stamper nor has she worked with distressed inks! You go girl!!!
Here's our Ceci working hard to distress her frame.
 And here are Maryanne and Nina admiring each others work.
Thanks ladies for a fun day with distress inks and thanks Barbara for another wonderful class!
Love Those 3-D Pop ups
 Hi Everyone,
Here are two examples of cards made with 3-D Pop-ups.
This one with the candles is so stunning. Unfortunately, you can't see the glitter, which really makes it pop!

And I really love these old fashioned girls..........they are just precious. Here, too, they look so much better in real life.
Stop by and see how easy it is to make these spectacular cards!
Thanks,
Anna
Thursday, October 7, 2010
Transfer Technique of all the Parts of a Peel Off Design
Many of you have asked that I do a Demo showing you how to get all of the pieces of a peel off design/image transferred to a card.
I had to do the demo in two parts......and here's the first segment.
Please see the next post below for the continuation of the demo.
I had to do the demo in two parts......and here's the first segment.
Please see the next post below for the continuation of the demo.
Transfer Technique Demo, Part Two
Here is the completion of the demo.
Peel offs are a fun and easy way to add greetings to your cards as well as borders and complete images. Hope you'll try it and see for yourself how easy it really is!
Thanks for watching,
Anna
Peel offs are a fun and easy way to add greetings to your cards as well as borders and complete images. Hope you'll try it and see for yourself how easy it really is!
Thanks for watching,
Anna
Monday, October 4, 2010
New Outlines Christmas Pins

Wow, don't these pins sparkle?
These pins were made with the latest stamps from Outlines and I used lots and lots of Swarovski crystals to make them sparkle! (There are more than 100 crystals on the snowman!)
These will look great on your winter coat or better yet, give them as a gift to that special someone! Join the class on Thurs, Oct 7 and make the Snowman pin, with a very special gift box and card. You'll then be able to mark a gift off your Christmas list ! Now, won't that be just dandy!
We're back from Canada
 Hi Everyone,
Soni and I are back from a great and very productive trip to Canada. Here are the samples we made from the new product. We got to play with the new "poinsettia" punches that also emboss and we used metallic paper. (The green card with the windows above) We also did some Pergamano and spirelli. And don't forget the new peel offs and clear glitter stickers.

The new embossing folders were terrific. Here, we used the Christmas ornaments embossing folder to make the 2 ornament cards above.
You will be glad to know that the new product (embossing punches, cutting & embossing dies, peel offs, 3-D pop ups, metallic papers,, and more) will be arriving this week, just in time for you to begin your holiday projects! Come in on Saturday, (Oct 9), any time after 11AM, for Show and Tell! Get to see the cards up close and personal as well as all of the new product and do a Make and Take!!! You won't be disappointed!
Monday, September 27, 2010
A New Meaning to "AA"

Thanks to Yvonne, there's a new meaning to AA at the Creative Corner. You see, one day when Yvonne was visiting, she said, "It's my day off, and here I am spending time and money at Anna's. It's an addiction. It's Anna's Anonymous!"
Well everyone in the store starting laughing and I knew at that time, I have to use Anna's Anonymous in some way. I thought of buttons! Yes, I thought it will have to say that "I joined AA, and I'm proud of it"!

I couldn't wait to get my idea to paper and so special thanks go out to my niece, Stephanie, who came up with the bold lettering and designed the wonderful button!
Stop by and pick yours up today! Let's show the community how much fun we have here!
Wednesday, September 22, 2010
To Distress or Not to Distress, That is the Question
 To distress............
 or not to distress. That is the question.
Barbara and I are preparing for a fun day class of stamping in TWO, very different styles: distress or not to distress.
 Here, is another sample of a distressed style card
 and of course, this is one that is not distressed.
These are only 4 of the cards you will make.
We have scheduled this class for Saturday, November 6th, from 10:30 - 3:30 or so. You'll get to make 6 cards and 4 tags, see how the same stamps are used differently, and get lots of technique instruction as well as use a lot of different product. Then at the end...........you'll make a 3-D Birdhouse ornament and you'll decorate it any way YOU want...........you'll choose to distress, or not to distress!!!
Call your stamping buddy, pack your basic supplies and join your friends for a fantastic day of stamping.
For more details check our web site calendar and don't forget to call the store to reserve your seat today!
Thanks and
Happy Stamping,
Anna
Stacy's New Stamps!
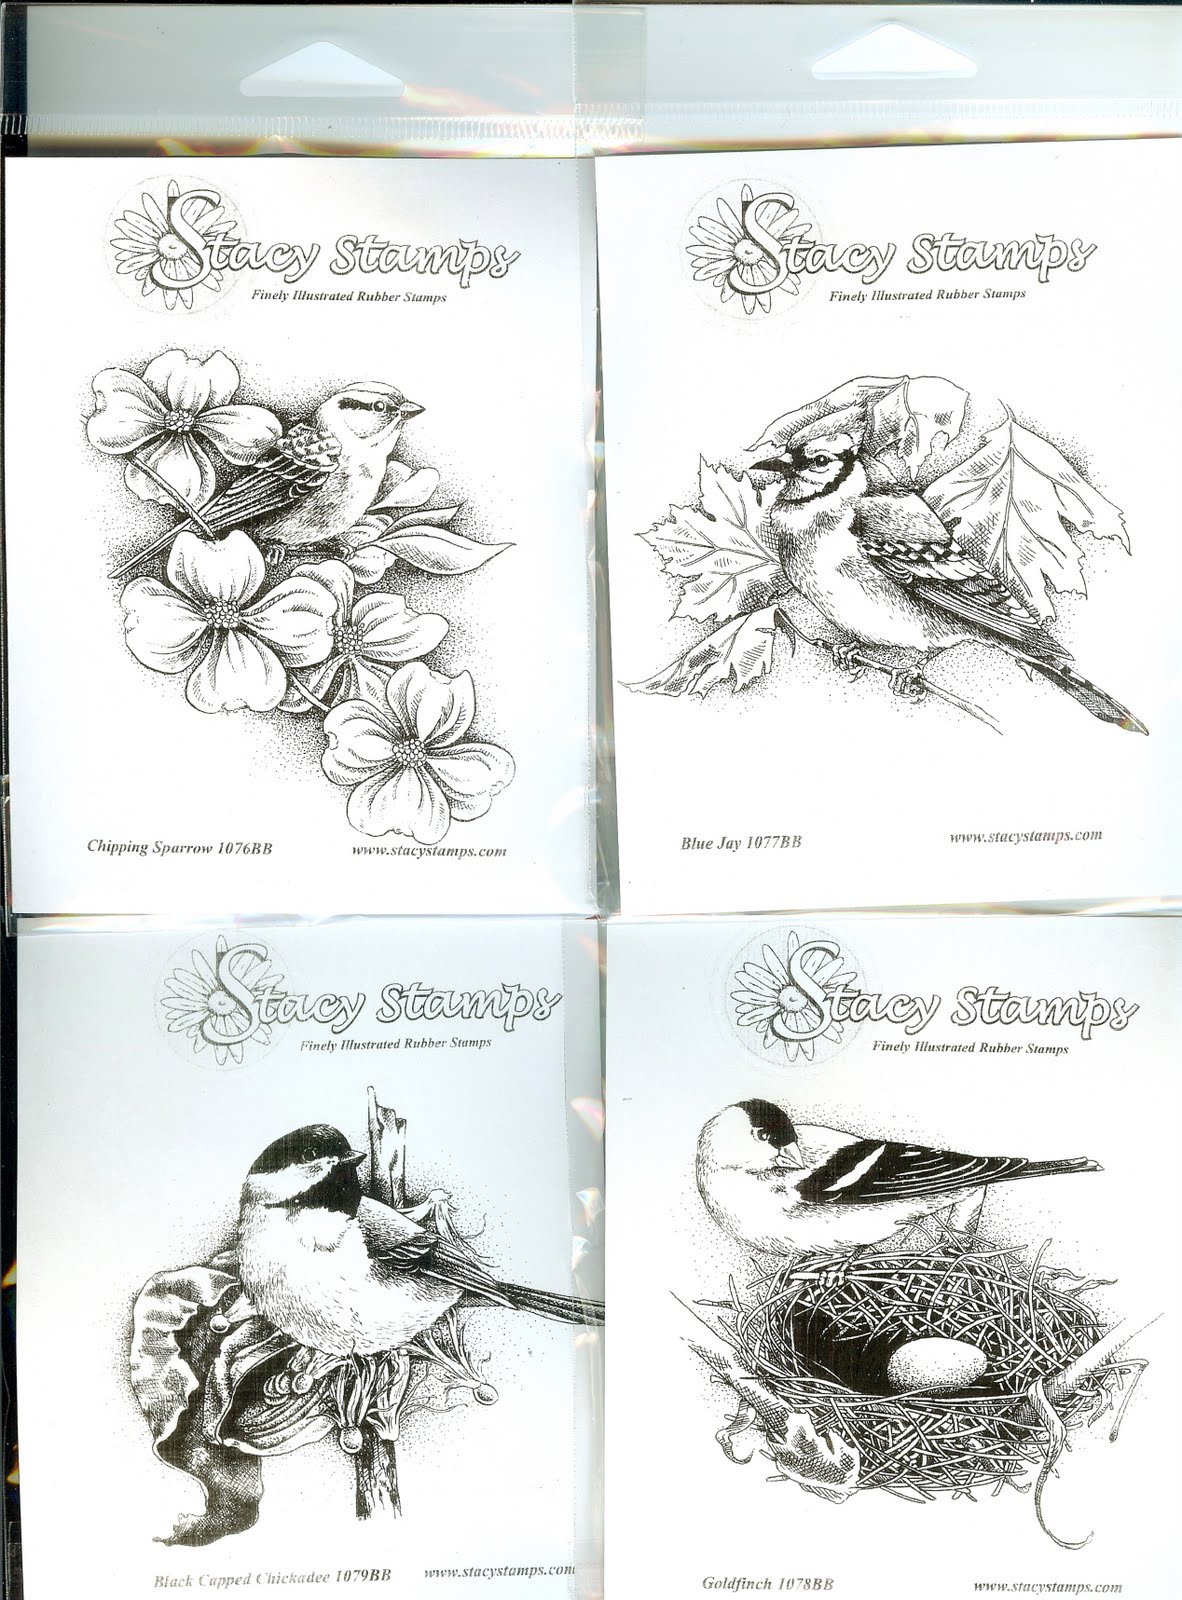
Stacy's new bird stamps have arrived and they are simply gorgeous! Just take a look at all the detail. Again Stacy, you out did yourself!
Monday, September 20, 2010
Stacy's New Floral Minis

I just love Stacy Stamps' new floral minis! Just so cute and versatile. Here are the 4 cards that you can make plus a card holder in Thursday's class. They would make a great gift. Hope you can join us!
Thursday, September 16, 2010
Watercoloring with Twinkling H2O's
I just love this watercolor technique I learned when Dave, from Memory Box was at the store in July. It's so easy, yet it gives you impressive results. Here's a quick demo to show you how to do it.....
And I'm happy to say that the really, nice and thick watercolor paper (140 lb) is in stock as well as the Twinkling H2O's.
Thanks so much for stopping by and
Happy Stamping,
Anna
And I'm happy to say that the really, nice and thick watercolor paper (140 lb) is in stock as well as the Twinkling H2O's.
Thanks so much for stopping by and
Happy Stamping,
Anna
Friday, September 10, 2010
Another Fabulous Card by Ginny Behrens!
As promised, here is the other card that Ginny made for me! Isn't it just spectacular!
 Ginny used Stacy's Pumpkin patch stamp and Impression Obsession's large, cover-a-card background stamp, leaves. The pumpkins were colored with Copics.

These are the Spellbinders scalloped border dies that Ginny also used.
If you would like to reproduce this card, all of the supplies are presently in stock.
Don't forget, Stacy Rich will be at the store tomorrow! Here's your chance to meet the woman behind the wonderful flower and triangle stamps!
Hope to see you tomorrow!
Anna
 Ginny used Stacy's Pumpkin patch stamp and Impression Obsession's large, cover-a-card background stamp, leaves. The pumpkins were colored with Copics.
These are the Spellbinders scalloped border dies that Ginny also used.
If you would like to reproduce this card, all of the supplies are presently in stock.
Don't forget, Stacy Rich will be at the store tomorrow! Here's your chance to meet the woman behind the wonderful flower and triangle stamps!
Hope to see you tomorrow!
Anna
Thursday, September 9, 2010
Gorgeous Christmas Card by Ginny Behrens!
 While I was away, I asked Ginny to make a sample using the new European cutting and embossing die. And boy did she out do herself!!!!! Isn't it just gorgeous!!!! She used a Hero Arts set of "Christmas Balls", and our favorite Impression Obsesion background stamp. Ginny also used the "distressed lines" Cuttlebug embossing folder and the wreath die cutting and embossing set.
 Here is a picture of the wreath die cutting/embossing set. As you can see, you also get the holly leaves and berries. This is now in stock as well as lots of new sets from Europe. They are very unique and everyone just loves them.
Check back, as I'll post a beautiful Thanksgiving Day card, also by Ginny. There she used the Spellbinders scalloped border die.
Thanks for stopping by,
Anna
I'm Back from Vacation!
 Hi Everyone,
I'm back from a great vacation visiting my Dad in Ohio! Maria was also able to meet me there and so we had a nice family reunion which included my brother's family.
Here are a few pictures ...........
This is with my Dad....doesn't he look great! He's 84 and still living on his own!
 And here I'm with Maria and my niece, Stephanie, nephew, Alex and my sister-in-law, Kristy. I always feel so short next to them!
I'm back now, refreshed, rested and ready for the busy fall season!!! I was able to recharge my batteries and thought of lots of new ideas for cards and classes; so keep a look out on the store's calendar for upcoming classes. I'll keep you posted.
Speak to you soon,
Anna
Subscribe to:
Posts (Atom)