Thursday, September 10, 2020

A Small Stampin’ Up Party

 Hi everyone and I hope all is well.

One Monday, Soni, Ginny Nancy and I got together at Nancy’s for a small Stampin’ Up party. 

Thanks so much Nancy for offering your home and your large dining room table so that we can do this safely. And thank you for the wonderful two cards you designed for us! 

Here are the two elegant cards we made.


What a fun and relaxing day!

Thanks for stopping by,
           ~Anna


Friday, August 7, 2020

Lovely Mermaid

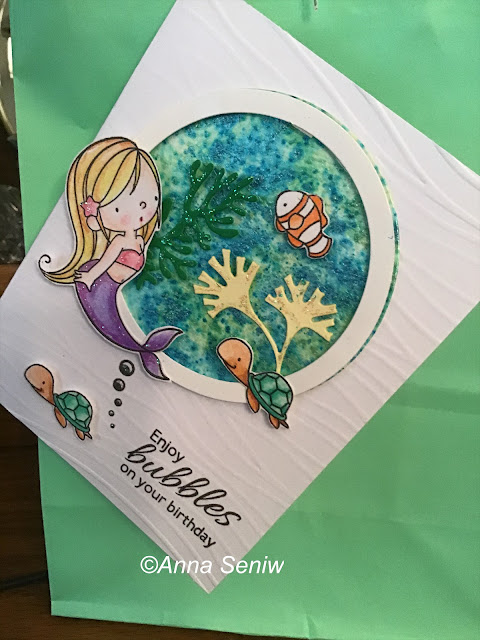
 Today I have a birthday card with a mermaid theme for you. When I first saw this stamp set from My Favorite Things, I didn’t think I would need it as I don’t make many kids cards. But then my friend Soni made me a beautiful birthday card with it and I just had to have it. Ha ha on me! 


This card actually is for a 5 year old. Hope she will like it.  I attached the card to the gift bag in order to quickly decorate the plain bag.

The card details: I used pixie powders on water color card stock to create the water background. Love the way they shine! And next I cut out some coral and attached the colored mermaid, turtle and clown fish. I actually have a whole bunch of items colored from that set and now that I have a card design I like, I can recreate this card pretty easily.

Supplies used: Stamps, MFT and Apple Blossom 

Cosmic Shimmer Pixie Powders: peacock green, emerald green, & aqua lagoon

Dies for the coral, Apple Blossom ( I fussy cut the mermaid, turtle and fish)

Embossing folder, SU

Stickles and Chameleon color tone pencils


Wishing you a “mermazing” day!

~Anna

Monday, July 20, 2020

Boot Scootin’ Boogie

The birthday of a good friend is coming up and I made a special card for her. We used to go Line Dancing for many years and really LOVED it. We had so much fun and it was exercise too! We were dedicated; did this for over 10 years and would still be doing it if it wasn’t for the teacher having her hours change at her job. We tried finding other classes to join with no avail unfortunately. But we still have the memories.  Here’s a link to the Music Video of “Boot Scootin’ Boogie” for old time’s sake.

https://www.youtube.com/watch?v=d05tQrhNMkA

And so I finally pulled out the Stampin’ Up “Bootiful Stamp Set and went to work with the cowboy boot.  I saw a post on Pinterest where the person made fringes for her card and thought that’s a wonderful idea. The person used special scissors to make the fringes. I don’t have such scissors and thought, well I could use my craft knife. But that would take a long time. And then I remembered that I had a Cheery Lynn die that made a flower but it looks like a fringe. (You would roll the die cut and it would become a 3 D flower.). I was so thrilled, I had to get out of bed at 11 o’clock or so and go downstairs and try it out! Found the die and made several fringes. 


It’s always exciting to be able to use your supplies in ways they weren’t intended to be used! 

Well, hope you have a wonderful day and thanks for “stamping” by!
~Anna

Saturday, July 4, 2020

Happy Birthday America!

Happy 4th of July everyone! Wishing you a wonderful and safe holiday weekend!

Today, I have a an appropriate card for the holiday! Being a New York girl, I love this Statue of Liberty die from The Frantic Stamper. When my friend Sue Speck sent me a card using it a few years ago, I had to get it.  Here’s a link to Sue’s blog and her card! She did a fabulous job with the die!  http://acardsmith.blogspot.com/search?q=Statue+of+Liberty+

So, I got inspired with Sue’s card and I started by cutting out 3 navy statutes and 3 silver. I was going to do what Sue did with Miss Liberty.; layer the silver over the navy and paper piece the navy pieces into the die cut. But I first placed the navy die on white paper and noticed how pretty it looked. So, I went a different direction. I decided to mat my navy die on white card stock and use the silver one on navy card stock! I then followed Jennifer McGuire’s advice of always to try to make multiple cards at the same time! And I was able to make 6 cards, basically at one time!

Here are my results:


I’m not sure which one I like better; the white background or the navy. But I think both came out well, and I got 6 for the thought of one card design! Thanks Sue (http://acardsmith.blogspot.com/ ) for your inspiration!

The inside was pretty quick, since happy is one die; also from The Frantic Stamper. And July 4 was also pretty easy, since the alphabet die I have cuts the whole alphabet at one time. Since none of the letters repeat, I only had to cut 6 alphabets. I also have lots of navy letters left for a future project.

Well, that’s it ladies.
Again, have a wonderful and safe 4th and see you soon!
~Anna

Tuesday, June 23, 2020

Lavender Birthday Card

Last week a group of friends celebrated Soni’s birthday. She is such a special friend and person and during these difficult and trying times we had to do something! And so we ordered lunch at a great organic place that makes fabulous sandwiches, picked up our order and had a wonderful lunch out on Soni’s deck —— with fresh air and physical distancing! It was a beautiful afternoon!

Here is the card I made for Soni. I had used the Altenew Lavender color layering stamp set. It also comes with a matching die.  I’m starting quite a collection of flower layering stamp sets yet this is the  very first card I actually made! The basic design of the card is from a class I held several years ago, and the background design is from the famous Kittie C.


I must say that I am very pleased with the way it turned out. even though I had to fussy cut the flowers! Yes, I do have the die, but the flower part and the stem is all one die. When I stamped the flower, I placed the stem where I thought it looked good. When it was time to use the die, the flower part matched up with the die, but the stem was off, slightly!!! So, I thought, great, why did I buy the die when I can’t match up the stamped image with the die. Well, I did learn from Soni how to solve that problem and I will post the solution with pictures within the next few days. Meanwhile, I hope you find inspiration from the flowers around you, especially this time of the year, and create some beautiful flower cards! Flower cards are perfect for any occasion!

Oh yes, the second photo is a close up of glitter! What else from the Glitter Queen!

Thanks for “stamping” by,
~Anna

Wednesday, June 17, 2020

Masculine Birthday Card

Good morning and I hope you are well. Today I have a masculine birthday card to share with you.

About two weeks ago or so, Ecstasy Crafts had their Virtual Open House.  Soni and I used to attend their real Open Houses in the past. They were always so much fun! I would also bring back so much inventory and many new ideas to share with my customers. This year, because of the pandemic, they still held their spring open house, but it was a virtual one.

We were able to do the make and takes by first buying the make and take kit and then tuning in on line and follow along with Katrina! It was a lot of fun and very informative.

One of the cards was a masculine card.  Here is the that card:


It’s a great card for any man in your life. Unfortunately, as I was putting my card together, I ruined the saying. (You see, the saying was a bit delicate, and when I was taking it off the adhesive sheet, I stretched the saying and couldn’t put it back together). So, I had to think of another way to complete my card.  I looked through my stamps and dies and came across a wonderful pennant die (by Marianne). I was thrilled because I thought it would work and I haven’t used that die yet, even though I had it for about 2 years! LOL

I also thought it would be great to personalize it and I looked at my alphabet dies and found one that fit perfectly!  Now here is my version of the design:


I was very pleased with the way it turned out. Like they say, there are no mistakes in art, just happy changes!  This is also a great way to personalize a card. And if the person’s name is too long, think of using Dad with a heart in the last triangle. Or maybe a nickname you have for that special guy. I would use Tato, which means father in Ukrainian. Perfect for Father’s Day. Wish I could send my Tato one. I truly miss him so since he passed in 2018.

Now, being the Glitter Queen I am, the second picture tried to show the stickles I added to the glass and the oranges.

Hope you’re having a wonderful day!
Enjoy Father’s Day and see you soon!
~Anna


Thursday, June 11, 2020

Hello Everyone!

Surprise! Yes, I’m back! You know how life just happens?
As you know, I have closed my shop, The Creative Corner. I miss the excitement of getting new product and sharing it with my customers! Yet, it was time to take a break. And so I took time off and regenerated!  I have always kept thinking about creating new card designs. I have created s few cards, but it was few and far in between.  I am ready now to go full steam ahead..........well maybe  not truly full steam ahead.........but at least more than a card every few months!

Let me post a birthday card I mailed my daughter last month.


Maria and I are both dog lovers and when I saw this die from Frantic Stamper, I knew I had to own it!


Here, you can see that I cut several of the die and layered them to give them dimension.  It sort of reminds me of chip board when enough layers are glued together.

At first I tried coloring the die cut, and it came out just okay. So I put it aside and had to think of another idea. 

Black and white with a pop of red color came to mind and I decided to run with it. I decided to raise the girl and the dog to give the card dimension. I learned this technique and idea a long time ago from Jennifer McGuire! Haven’t used it in awhile though. Just cut a bunch of the die and glue the die cuts together! It gives it a nice thickness, similar to chip board. Lastly, I added stickles because we know we always need a bit of glitter in our lives! The stickles really made the card pop! All in all I was pleased with the outcome! And I have to say Maria loved her birthday card!

Thanks so much for stopping by!
Looking forward to posting more creations! 
~Anna