Showing posts with label Punches. Show all posts

Friday, August 12, 2016

Beautiful Rose Border

Happy Friday!
Today I want to share with you a new card I made with the new "Rose Border" die from Frantic Stamper.  When I saw the die, I couldn't wait to get!!! And I just received it this week and here is my sample!


A very simple card, but still very pretty and elegant!  In addition, it is pretty quick to make!  The only tricky part is paper piecing the green leaves in the correct area.

This card will be part of the Roses Card class that will be scheduled for next month!

Supplies Used:

Dies:      Frantic Stamper, Rose Border
Punch:    Nelli Snellen rose leaves punch and embosser
Stamp:   Hero Arts

Thanks so much for stopping by,
           ~Anna

Monday, July 18, 2016

New Sympathy Die from Impression Obsession

Happy Monday!

There comes a time when we need to make a sympathy card, and in those times we like to create something beautiful for the recipient.  This die helps you do just that.  Once I saw this new die in the new release, I imaged that if I add a few flowers, it would make the perfect card.

 So simple, yet very pretty.  

Next, I reversed the colors - cut the die in white and layered it on a colored background. 

And, lastly, a sample with just the "sympathy block" die and a border.  This of course is when you don't have the time to decorate the card, but it still comes out very nicely.


Supplies used:

Dies:  Impression Obsession "sympathy block", rectangle borders and stitched rectangle borders
          tiny  flowers
          small butterflies and medium butterflies
          Cheery Lynn cherry blossom die
Punches:  Nellie Snellen punch & emboss rose leaves


Thank you for stopping by,
      ~Anna

Friday, December 5, 2014

Sweet Christmas Wishes Topped with Love

Love this cute card - the Make and Take for this weekend's Christmas Open House.


Supplies used:
Dies:  Impression Obsession's take out coffee and Christmas charms sets
Stamp:  Impression Obsession
Other:  Stickles, smallest Marvy's heart punch, Sizzix/Hero Arts snow embossing folder, peel offs

Looking forward to seeing you!
                 ~Anna

Saturday, October 11, 2014

A Simple Christmas Card

Happy Saturday!   Today I wanted to post a simple card I made using the Tattered Lace Kensington Corner die; and by placing it not in a corner, you get a nice, different look.

The deer is an Impression Obsession die and then I used Nellie's punches for the pine and flower for the deer's neck.  The finishing touch were some pearl dots made with a Viva Decor pearl pen.  It's simple so you can mass produce this one for Christmas!

Supplies used:
Stamps:  Merry Christmas (unknown) and heat embossed in white
Dies:      Tattered Lace Kensington corner, Impression Obsession large deer set
Punches: Nellie Snellen mini flower & butterfly set, pine branch
Other:     Viva Decor pearl pen

Thanks for "stamping" by,
               ~Anna


Wednesday, June 25, 2014

A Little Black Box

Just as every woman likes to have the perfect little black dress in her closet, so goes it for us crafters and the little black box; perfect for so many occasions. 

I love making these boxes since they look so professional.  Once you make the box, you only need to decorate it and you are done.  (And if you use printed paper, there is not much decorating needed.)

I decorated the top with the Tattered Lace florentine bow dies.  I know that when I first saw those dies, I thought, "why are they called bows"?  Well, if you curl them and sort of fold them in half, but not all the way, you have the loops!  I layered two loops and then used the Cheery Lynn cuties to make the flower in the center.  Added some leaves from the rose leaf embossing punch and that was it;  pretty black and white with a bit of red!

If you would like to learn how to make this decorated origami box, as well as 3 other kinds of boxes, join us for class this Saturday, June 28@1PM.Be sure to call or email to reserve your seat!

Supplies used:
Dies:  Tattered Lace Florentine bow set, Cheery Lynn cuties 2
Punch:  Large rose leaf floral punch & embosser by Nellie Snellen


Thanks so much!
       ~Anna


Friday, April 25, 2014

Just a Nice Simple Card with Glitter

Good Friday Morning!
I was inspired by a card I saw on Pinterest and decided that it would be prefect for a get well card.  I love that it is bright, simple and  very spring like.  And of course it is very sparkly!  Hopefully it will raise the spirits of the person who will be getting it.

The layout is simple and conducive to making a whole set of these if need be.  It would make a great gift! (It is never too early to think about Christmas gifts!)

Supplies used:
Dies:  Cheery Lynn Flower strip
Punch:  Punch Bunch tiny center
Stamps:  Hero Arts, feel better soon
Glitter:  Glitter Ritz, emerald

Enjoy your weekend!
And thanks for "stamping" by,
            ~Anna

Wednesday, October 9, 2013

A Snowy Wintry Forest Scene

Tags, tags and another tag!  I had fun creating this wintry scene tag and the birch trees die and the deer trio from Impression Obsession were perfect for the task. 

I used distress ink and copics to add color and stickles put the finishing sparkly touch to the project!

Get into the fun and create some tags!
Have a wonderful day!
        ~Anna

Supplies used:
Dies:  Impression Obsession Birch trees (comes with 2 birds), Impression Obsession Deer trio
Embossing folder:  Sizzix
Copics:  Cool grays, browns, reds
Distress ink:  Antique linen
Other:  Nellie Snellen Duo punch of tiny flower & butterfly, stickles

Monday, September 23, 2013

Great use of Snowmen "Toppers"

Happy Fall!
Yes, fall came in yesterday and now time is just ticking away.  Have you started your Christmas projects yet?  I got these snowmen "toppers" in and they are not only gorgeous but so easy to use.  I made a tag and then used a different snowman topper to make a card. (Basically, take the tag and expand it onto a card!)


These toppers are simply great if you want to mass produce some tags or cards.  These snowmen are so cute, made of excellent card stock quality, already pre-cut for you and with gold foil and glitter!  You get 10 different snowmen in the package! 


Each snowman is package in an envelop with the 3 layering pieces!  You just take one envelope out and put the guys together.  (only 3 layers to build!)  Layer the completed snowman on a tag or continue making a card.  Soooooo simple and quick!  I know I will make 10 quick cards and have these guys ready for sending out in December!  And the whole package of 10 snowmen go for only $8.25!


And to see how nice and quick these are, come by on Saturday, September 28 and make a tag!!!  You are going to fall in love with these guys!


Yes, since it is now count down to Christmas making ideas, I will try to have as many Make and Takes for you!  Next Saturday,  October 5 will be a Pergamano Make and Take!!!  I'll post that tomorrow!

ALSO, on Saturday, October 5 at 1PM, we'll have the very popular, Tag You're It class!!!  Come and make several Christmas tags PLUS a tag for a wine bottle that you will be able to use for Thanksgiving!

Fall is here and the Creative Corner is here to help you make your holidays fun and creative!!!

See you real soon!
     ~Anna

Wednesday, September 18, 2013

Glittery Christmas Tag

Happy Wednesday!
Today, I want to share a Christmas tag I made with micro fine glitter and Dee's stacking tree dies. 

It is so simple, yet so sparkly and perfect to dress up any gift under the tree. 

I also want you to notice the small star on top of the tree........it's a new die cut from Dee.  What is great about it is that you get so many stars on the die plate, so that when you run it once through your machine, you have enough for lots of cards or tags!

Which brings me to the point that several of you have asked that I hold a Christmas tag class.  It is in the works!  I am working and designing several tags which you will make in that class and be ready to dress up your presents.  OR, you can take the design and expand it onto a card.  Keep a look out for the dates........I will post them this week.  Time is flying by, the air is getting cooler and we need to start our fall project now!  Keep in touch!

Thanks for "stamping" by,
            ~Anna

Wednesday, May 29, 2013

A Sympathy Card

Impression Obsession has a very nice saying stamp for sympathy cards and I used that stamp as the starting point for my card that I recently had to make for a fellow parishioner who lost her young husband. 


I made a frame with the Spellbinders Labels Two and stamped the saying inside of it.  I layered it on card stock that I embossed with the new embossing folder from Crafts-Too and then decorated around the frame with flowers and leaves.  The last touch was the Cheery Lynn butterfly and of course a bit of stickles strategically placed.  Oh yes, I also used Viva Decor pearl pens to make pearls for the centers of the flowers and the body of the butterfly.

You may be surprised that this is a sympathy card, but not all sympathy cards have to be of a dark color palette.  Dark colors sometimes make the card look a bit too sad and most of the time I try to stay away from them.  Hope this gives you some inspiration for these sometimes difficult cards to make.

Thanks for stopping by,
            and
Have a wonderful day
         ~Anna


Tuesday, May 7, 2013

To Distress or Not - That is the Question!

This past Saturday we had our Make and Take Day and everyone loved making the following Cameo Card.  The ladies really liked the old fashion and feminine look of the cameo.


Barbara Thomas joined us and she too created a card for her Mom, but Barbara had to change it up a bit of course with her favorite Tim Holtz distress inks!  And here is her creation:

I just love it!  And so did everyone else!  

Of course I have distress inks and never think of distressing my work; and Barbara, ALWAYS distresses hers!  I guess we just get comfortable in our own way. 

Awhile back, Barbara and I teamed up and offered a fun class class, called "To Distress or Not" and we decided to do it again!  This time we'll use more dies and some new stamps!!!  You'll create 6 cards; 3 "clean" cards designed by me and 3 other cards designed by Barbara using distress inks!  Both sets of cards will use the SAME stamps, dies and supplies, but you will get TWO different looks!

This great class is scheduled for Saturday, June 8 at 11AM!  Join the fun and learn how to stretch your supplies and get two different styles!  Call or email to reserve your seat today.......this class was very popular last time and filled up quickly!

Oh yes, if you take the class, you will be able to buy the stamps and dies used for the cards at a 10% discount!  

Looking forward to hearing from you soon!
            ~Anna

Thursday, April 25, 2013

New Cameo Frame Die and Punch Set

Hello Fellow Stampers!
I know you have been patiently waiting for these new cameo frames and punch sets and they have finally arrived!!!  I also couldn't wait to get my hands on them and make a sample.

I kept the design of the card simple because I wanted the Cameo to be the focal point. 

Here, you can see that the frame of the cameo comes from a die.  Next you punch out the oval and place it in the embosser to get the pretty raised image of the lady.  I used pink Bazzill paper (the smooth side) and embossed the image.  I then used Colorbox cat's eye Frost white ink directly to the paper to get the cameo lady creamy white.

These cameos come in 3 sizes; small, medium and large.  I used the large one on my card, again because I wanted it to be the focal point.

These just arrived from Europe and since they are so unique, I am sure that they will be a hit. Let me know if you would like one of these sets and I can set it aside for you!

Thanks for stopping by,
        ~Anna

Monday, March 18, 2013

Another Card with the Anja Corner Die

Even though we still have snow on the ground, I keep dreaming of spring flowers!  I also love the Anja dies and therefore went for the corner die to make another card with flowers, of course.

This time I used a peach and cream color scheme.  I used the Cheery Lynn cherry blossom dies and a few Nellie Snellen punches.  I added a sentiment, but this can easily be a card for any occasion!

Thanks for stopping by,
        ~Anna

Sunday, March 17, 2013

Happy St. Patrick's Day

Just a simple St. Patty's Day card for today!

This is an example of a different and great use for your heart punches. And surprisingly,  the little squares came from paint chips!

Hope you'll have a great day!
               ~Anna

Wednesday, March 13, 2013

Spring is in the Air!

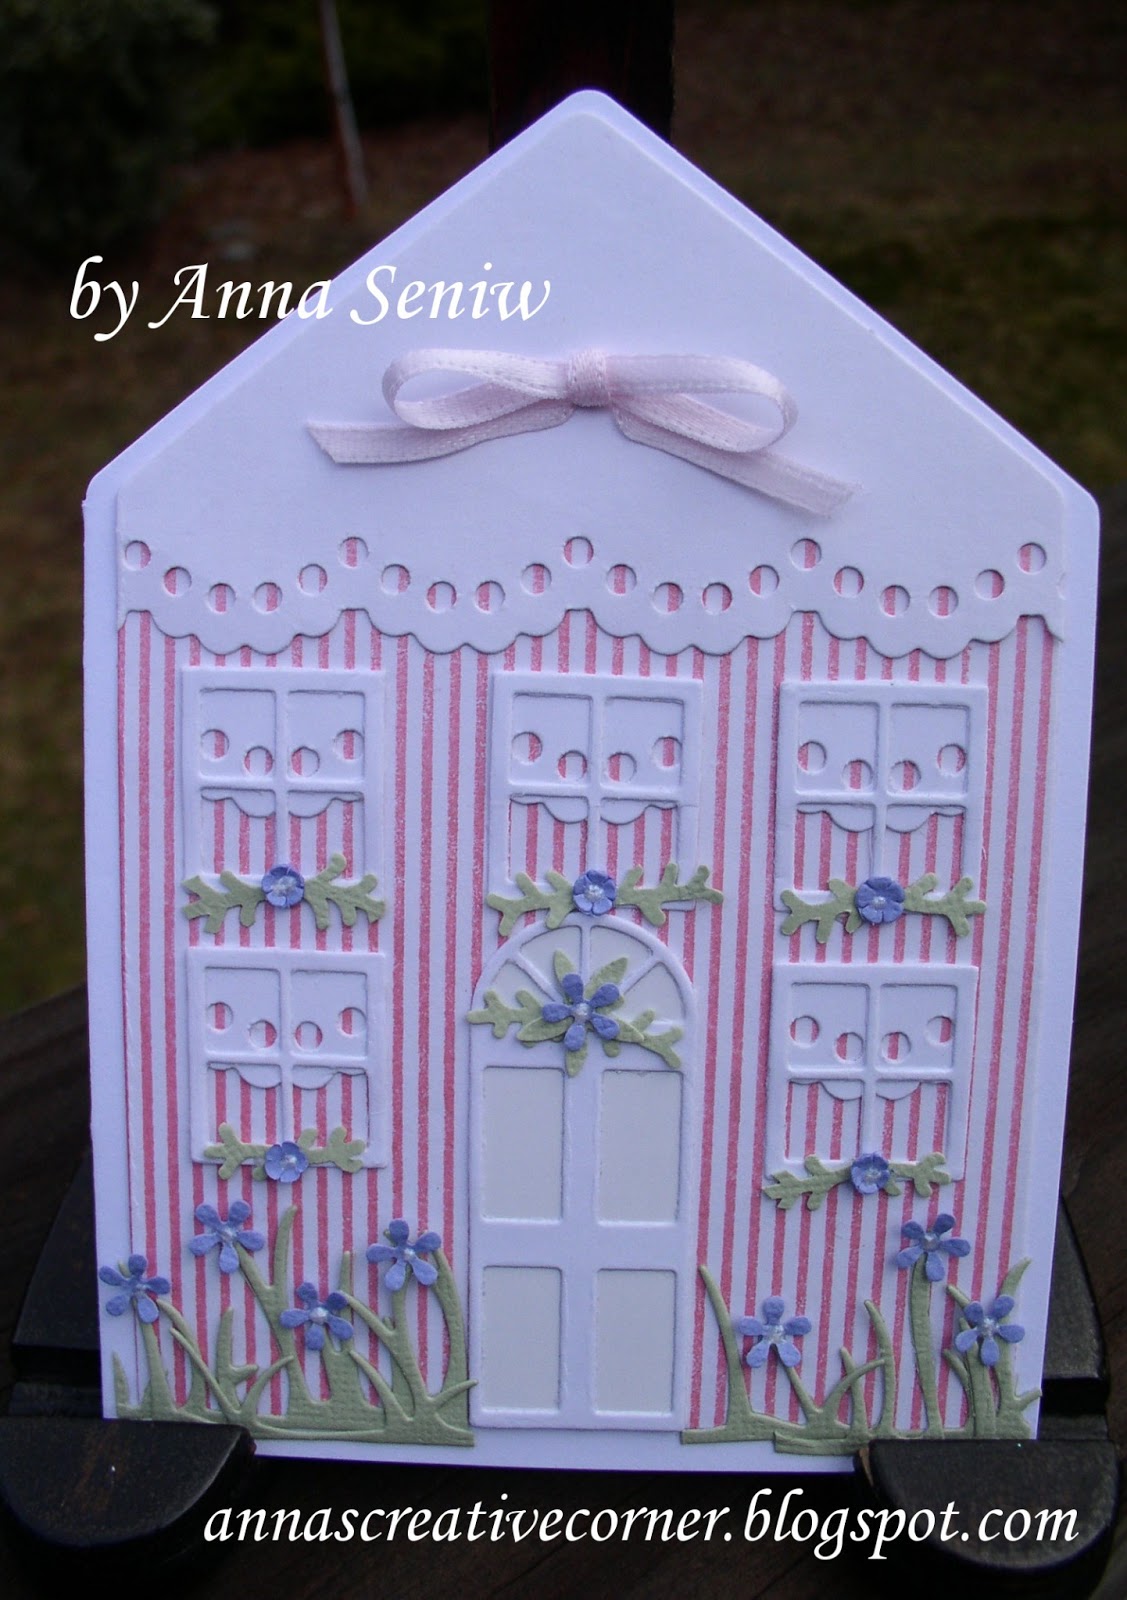
The sun is out, the temperatures are creeping upwards and therefore it is time to create a new "house" card with spring as it's theme.

Back in December I created a "Christmas House" card.  (You can see it HERE)  In January, I made a "Valentine" bird house and you can see that one HERE.  Now was the time to change the colors, add grass and flowers for a new and updated look!

I stamped the house with Impression Obsession's Cover a Card background stamp and then die cut it out, also with an I/O die.  The grass is a Cheery Lynn die as well as the tiny flowers on the windows.  The other purple flowers are from one of my most used punches from Nellie Snellen; the tiny twin punch, flower and butterfly.  The doily affect is a border die, also from Nellie Snellen,

Now, just stamping a saying on the inside of the card seems so boring.  We have so many dies and stamps that I decided to decorate the inside too. 

I used the doily die to tie it in with the front curtains and roof line; a small butterfly was an added sweet touch.  I  also added the grass and flowers and still left room for a personal note.

These house cards are so sweet and fun to make............try your hand at it.  You are going to enjoy making them as well as giving them.  Let me know if you need any of the supplies listed and I'll get them to you in no time!

Looking forward to seeing what you create!
               ~Anna

Thursday, February 28, 2013

Pretty Egg Shaped Easter Cards

Cold and dreary February is coming to an end and Easter is just a month away!  We already see that the days are longer and hopefully the snowy weather will also end very soon.

I have been working on some new, egg shaped Easter cards and I am pleased with the results.

I used the Cheery Lynn nesting egg dies just as I did last year.  (You can click HERE to see last year's card.)  This time I decided to make several cards, all with a flower theme.  I looked through my dies and pulled out two different flourishes from Cheery Lynn, as well as several of their flower dies.

Here are close ups of each of the eggs:


These eggs were a lot of fun to make and now, sitting back and looking at them, makes me feel that spring is truly just around the corner!

Thanks for "stamping" by and
Looking forward to seeing you soon!
              ~Anna

Monday, February 18, 2013

White on White with a bit of Pink

I got this new "Square Frame" die from Joy Crafts and had to make a new card.  The frame is beautiful with all the detail, a bit of lattice work and the dry embossing.  And since I love the white on white look, I started the new project with that theme in mind and am very pleased with the results.  I ended up making a birthday card, but this easily lends itself to a pretty wedding or anniversary card.

Here is another view of the card,  Hopefully you can see all of the dimension. (Of course the card looks so much better in real life.)

I used Cheery Lynn dies for the butterfly and the flowers.  (The flowers were the Cherry Blossom dies).  I added the leafy flourish from Marianne and used the Nellie Snellen punches for the 3-D leaves. 

Let me know if you want the new Square Frame.  I can mail it out to you in no time!  You are going to love it!

Thanks for stopping by and have a great day!
              ~Anna
Remember, if you click on the picture, you will see a larger and close up version of the card.

Tuesday, February 5, 2013

Chevrons Made with Square Nesting Dies!

As you know, I am taking the CAS card class.  Saturday,  JJ Bolton showed us how to make chevrons with square dies!  What a clever idea and a great way to "stretch" the use of your dies!  I couldn't wait to go and try it out!  Believe me, it was as simple as she had demonstrated!  The hardest part was to evenly space the nesting square dies and tape them down.  I used "Post-it" tape and it worked wonderfully.  Another great tip was to use the same Post-it tape and lay the chevrons on it.  This way you can space them out evenly and then adhere them to your card all in one step.

When I passed the dies through my Big Shot, I ended up with 8 chevrons.  Each time I used a different color card stock, I got 8 more chevrons.  Once that was done, I only had to put the card together.  I just love this bold and modern look.

I then had to try another color combination and thought of a patriotic card for our soldiers.

Stop by if you need some extra help or tips in getting your chevrons done.  These are so addicting, you won't be able to stop making them!

Looking forward to seeing you,
           ~Anna

Thursday, January 24, 2013

Double Matting by using Oval Dies

Good Morning Everyone!   Actually a very cold morning; but it's January and there is nothing we can do so let's craft! 

I've seen many cards on Pinterest that show double matting recently.  I therefore tried it with two oval dies from Spellbinders and here is what I came up with:

Of course I had to add a flower (Cheery Lynn rose die) and a butterfly (Nelle Snellen punch with embosser) adorned with stickles.  Spring just has to be here soon, right?

Keep on stamping and crafting,
          ~Anna

Wednesday, January 16, 2013

A Clean & Simple Valentine Card

Here's a very simple Valentine card.  I have to say I love these simple cards; they're quick yet very pretty and if need be, you can make several in no time!


Be safe today.  It's a good day to stay home and make some cards!
            ~Anna