Showing posts with label Hero Arts. Show all posts

Wednesday, August 31, 2016

Simple Birthday Cupcakes

Happy Wednesday!

Here are two birthday cards I made over this past weekend.  And literally, the stickles was drying on the second card while I jumped into the shower to get ready for the 50th party I was going to!!! LOL


I needed to make the card for a friend's 50th birthday and I thought that I was finally going to use my "tool" dies, BUT that didn't happen. The week flew by and I didn't even start with pulling the colors together. So, on Friday I decided to make a cupcake card after a browsed Pinterest over the past few days. Next our Matushka left me a message and was hoping that a had an extra card lying around for our Bishop's birthday!  I had to laugh..........as everyone knows that I have A LOT of sample cards, but not to use. Just like the shoemaker's kids not having shoes, I'm the card maker with no cards! LOL.   But I couldn't say no, I mean it was for the Bishop and I truly felt honored that Matushka thought of me. So, I told her that I did have pieces cut for a birthday card that only needed to be put together. Or since I was planning to make Bill's card in the morning, and if I liked the way it was developing, I would make another card at the same time.

Well, as you can see, I ended up making two cupcake cards! I would have loved to have made a more elaborate card for the Bishop, plus at least a 5X7 card, so that it would be big enough for everyone to sign, BUT time just didn't let that happen.

As I was creating the card, I really liked it; it is so cute!  Matushka loved it and I was very thankful!


Here are close ups; you can see the detail of the embossing folder.  


As you know, I'm so in love with the teal color combo. Also, notice that I only used strips of teal card stock underneath the saying; a great way to save on colored card stock! 
 
Lastly, the bit of stickles on the frosting and candle was just enough to make everything pop!
 
I know I will be using this layout again; it's simple, cute and pretty fast! You can make several of these pretty quickly!
 
 
Supplies used:
 
     Dies:      Marianne Creatables Cupcake die (it includes the candle and two different cupcake frostings)
     Embossing folder:     Cuttlebug Birthday Sayings
     Stamps:    Hero Arts Birthday sayings clear set
     Other:      Stickles and gems
 
 
Thanks so much for "stamping" by!
               ~Anna


Friday, August 12, 2016

Beautiful Rose Border

Happy Friday!
Today I want to share with you a new card I made with the new "Rose Border" die from Frantic Stamper.  When I saw the die, I couldn't wait to get!!! And I just received it this week and here is my sample!


A very simple card, but still very pretty and elegant!  In addition, it is pretty quick to make!  The only tricky part is paper piecing the green leaves in the correct area.

This card will be part of the Roses Card class that will be scheduled for next month!

Supplies Used:

Dies:      Frantic Stamper, Rose Border
Punch:    Nelli Snellen rose leaves punch and embosser
Stamp:   Hero Arts

Thanks so much for stopping by,
           ~Anna

Tuesday, July 12, 2016

A Thank You Card and Coordinating Gift Box --- When a Card Just Isn't Enough

HELLO EVERYONE!!!
I'm back!  Yay!!!
So glad to get my "mo-jo" back and get back to blogging!
And I thank you so much for your continued support!!!

So, let's get down to business.
 
Recently I had to thank someone and knew that a card was simply not enough. So being the crafters that we are, I made a coordinating box and filled it with chocolates --- because, who doesn't like chocolate, especially Lindt truffles?

Here is what I created


I have been on a "teal" kick for awhile and had to use it here.  The card stock is from Hero Arts and by sanding the embossed medallion, the white core of the card stock comes through and you get both colors on one sheet!  I stamped and heat embossed the vellum and added the Cheery Lynn butterfly to complete the design.  The box is made from the same card stock with Cheery Lynn flowers and Marianne leaves. The "for you" die is from Impression Obsession.

Clean and simple, yet it makes a nice statement!

Thanks so much for stopping by,
Anna

Wednesday, June 24, 2015

An iPhone Birthday Card

It's the age of the iPhones and smart phones!  I have been wanting to create an iPhone card for the longest time and I finally made one for my son-in-law!  It was so much fun.  Gary has a black iPhone and I took it from there.  He doesn't use a case but I used my artistic license and "created" a teal one for him. 


On the inside, I even stamped #s to tag Gary's 30th birthday!

For your convenience, here are the dimensions of the card:
     Teal layer   3" X 5 1/2"
     Black     2 3/4" X 5 1/4"
     White    4" X 2 1/2"
Don't forget to round the corners except for the "screen".

Hope you'll try making a personalized iPhone card for your loved one soon!


Thanks so much for "stamping' by,
           ~Anna


Supplies used:
Stamps:     Impression Obsession, Hero Arts, Marianne, Just Rite alphabet
Other:     Star punch, Crop-a-dile

Thursday, February 26, 2015

Go Yankees!

Today is the first day of spring training for the Mets and the Yankees!  This can only mean that spring is just around the corner!!!  And hopefully warmer weather!!! We so need it!

In honor of spring training, here is a fabulous box card that Cecilia Prange made for Soni last year.  I finally came around to post it!  Sorry Ceci that it took so ling and that this post got away from me. 

Now, if you know Soni, you know that she is an avid Yankees fan and just loved this surprise box card that she was able to display through the entire baseball season!


Ceci gave us some tips: she went to the Party Store and was able to get Yankee themed wrapping paper and some other goodies to fill the box.  (The wrapping paper was very economical with lots of pictures that she was able to cut out and use.)

Here are some more views:


Ceci also used some Cheery Lynn dies as well as Marianne, Joy, and HeroArts dies, and even some punches.  It's a birthday gift in itself!

Now I know what I'll create for my brother for his birthday!  Though it will be Mets themed!  Go Mets!

Thanks for stopping by and have a great day!
                ~Anna

Thursday, February 12, 2015

Using an Old Fashioned Typewriter to Write Love Notes!

Happy Lincoln's Birthday!

I have created this card back in August and used it as one of the Make and Takes for our anniversary celebration.  I realized that I did not post it and looking at it now, it is perfect for Valentine's Day!  (And for any day for that matter; you do not need an occasion to tell someone that you love them!)


This is a simple layout, but so darn cute!

If you add a flower, it will make it more feminine.  The saying comes with the typewriter die set; it actually comes with 6 sayings!

Supplies used:
Stamps:  Hero Arts newspaper background
Dies:   Marianne Collectable, Eline's typewriter die and clear stamp set


Thanks for "stamping" by!
Have a great day!
        ~Anna

Wednesday, January 21, 2015

Simple and Fun Get Well Cards

Hello Stamping Buddies!
It's the middle of January in the northeast and it seems like we are getting some kind of snow or ice once a week now and I just hate that.  But in turn it gives us time to be indoors and craft (yay)!  See, there's always a plus side!

Lawn Fawn has two great stamp sets with coordinating dies that can be used for some very cute get well cards.  If you know me, you know I don't take meds, unless it is totally necessary, but I just LOVE the little prescription bottle in the "Get Well Soon" stamp set!  It's just so cute - and here is the card that I came up with:

For my second card, I used Impression Obsession's "Under the weather" stamp, and umbrella & cloud dies.  The card is only 3 1/2 X 3 1/2 and perfect to be attached to a gift bag with some goodies for the patient!


There you have it!  These are two of the cards that you will be able to make in the Get Well Cards class.  Check us out tomorrow for more Get Well Cards!

Thanks for stopping by and we look forward to seeing you soon!
                       ~Anna

Sunday, October 5, 2014

Modern Christmas Cards - One Design, Three Different Colors

Good Day Everyone!

First I would like to thank everyone for being so supportive and patient with me.  .My personal life schedule has changed and I have been working hard to get everything to fall into place, especially with the Creative Corner.  Again, thank you for being here and patiently waiting for my blog posts and the updates on The Creative Corner!  I truly appreciate it.

We had a wonderful Make and Take yesterday and I have to say everyone liked their unique and untraditional jade color Christmas card.  Here is what we made:
I just love these Hero Arts stamps and have had them for such a long.  I finally got around to create these cards.

As you know, I have been in love with the color teal over the summer and I wanted to use it here.  I used Brilliance Pearlescent Jade and it gives the card a very pretty shimmer.

So, yesterday, we had some really dedicated stampers for the Make & Take!!!  Unfortunately, we lost power for a short time, but Charlene and Jamie wanted to make their cards and so they worked in the dark!!!  Now, that's dedication!

The pictures really don't show how dark it got because of the flash from the camera.  But you can see that we had candles, a flashlight shining onto the work table and Gladys holding her iPhone with the flashlight app!  Thankfully, the outage was not for long and those who came later were able to work in light!


After everyone left, I decided to see how the beautiful stamps would look in different Brilliance colors.  Now,I don't know which one I like best - they all look great!  What do you think?


Supplies used:
Stamps:  Hero Arts, Winter Moon and Many Branches Tree
Dies:  Impression Obsession, Set of tiny birds and Small deer set
Ink:  Tsukineko Brilliance Pearlescent Jade, Lavender, and Coral, Versacolor evergreen, Marvey  matchables violet, Memento rose bud
Glitter:  Micro fine glitter, deep purple, silver and ocean spray


Thanks so much for stopping by
             ~Anna

Sunday, July 6, 2014

The Elegant Chantilly Bow

Happy Holiday Weekend!

Hope you are having a wonderful holiday weekend.  I celebrated the 4th by setting aside some time for myself to play with the chantilly bow die from Tattered Lace.  I have been wanting to create with this die for quite some time but time seems to keep getting away from me!

I had a layout in mind and even the color scheme of white on white with teal as the accent.  Teal is becoming my new go to color this summer.  I even picked up a few new kitchen towels with teal in them!  I think because it reminds me so much of the beautiful Caribbean sea and how much I love sitting on my favorite beach in Barbados and taking in the stunning scenery.  I am so grateful that I was there just a few months ago for Maria and Gary's wedding.  So many wonderful memories and..........dreaming of my next visit.

OK, now back to reality and my card ------

I cut the pretty bow die twice - once in teal (Hero Arts pool card stock set) and once in white.   I cut the white bow in order to layer it differently underneath the teal one.  I also used the new 5 X 7 embossing folder (delicate hearts).  I picked a white rose that I had already made previously and added it to the center of the bow.  I am so pleased with the outcome. It is so pretty and really can be used for so many occasions.  And it was a QUICK card!  I only fussed with the bow - curling it a bit and raising it when adhered it to the card.  The finishing touch was made with a Viva Decor pearl pen.

Here is a side view so that you can see the layers, depth and detail of this card ---


Now, onto my next creation.  Well, actually, it's off to work soon!  But, hopefully I will have some more time this week to create some new cards for your inspiration.

Supplies used:
Stamp:  Hero Arts
Dies: Tattered Lace chantilly bow, Cheery Lynn cuties 2
Embossing folder:  Delicate hearts
Ink:  Brilliance pearlescent jade
Other:  Viva Decor pearl pen


Thanks so much for "stamping" by
    and have a wonderful Sunday!
                    ~Anna

Saturday, June 7, 2014

Father's Day Make & Take

Just a quick post of the card we will create in today's Make & Take!  Perfect for Father's Day.........or a "guy" card for any occasion.


In addition, learn the basics of Pinterest during today's presentation and join this fun group that is the fasting growing social media on the net today!!! Even faster than Facebook and Twitter!

Looking forward to seeing you,
          ~Anna

Tuesday, May 13, 2014

Cupcakes Galore

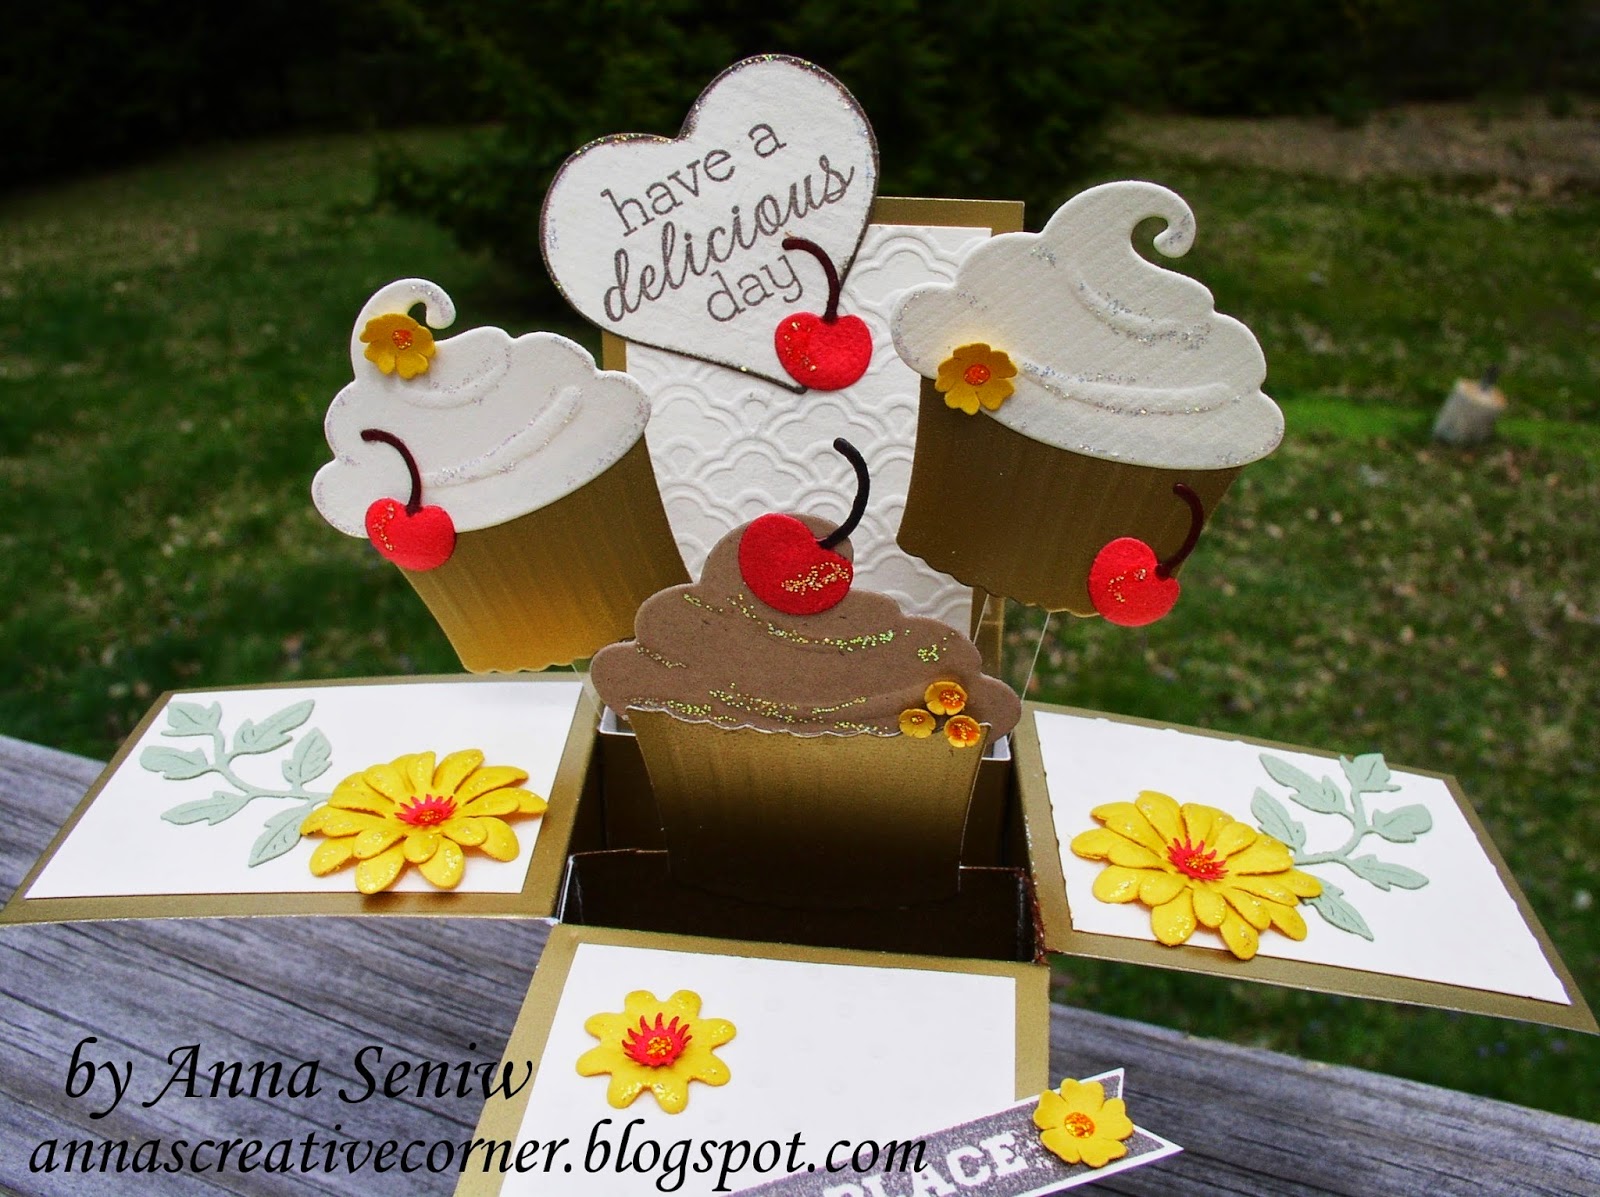
Yay cupcakes!  I don't think that there is anyone out there who doesn't like cupcakes!  And of course I decided to make a pop up card in a box with cupcakes and cherries!

I used gold, chocolate and cream colored card stock (it may look white, but it's cream for vanilla) to make the cupcakes.  The Marianne Creatable cupcake die set includes a cherry, a candle and a flower die; perfect for decorating the yummy snacks.


I decided to use the saying, "My Happy Place" - perfect for any occasion.  I have to laugh because when I think of the saying, "go to your happy place", I think of the movie, Happy Gilmore!  LOL!   I believe that cupcakes can be a happy place for many!

Supplies used:
Dies:  Marianne Creatables cupcakes set
            Nellie Snellen multi frame heart dies MFD 022
           Joy Crafts daisy set
           Cheery Lynn - flourish leaf strip, baby's breath flower kit
Stamps:  Hero Arts

Thanks for "stamping" by
    and I hope you're enjoying the nice weather we're finally having!
                                                ~Anna

Friday, April 25, 2014

Just a Nice Simple Card with Glitter

Good Friday Morning!
I was inspired by a card I saw on Pinterest and decided that it would be prefect for a get well card.  I love that it is bright, simple and  very spring like.  And of course it is very sparkly!  Hopefully it will raise the spirits of the person who will be getting it.

The layout is simple and conducive to making a whole set of these if need be.  It would make a great gift! (It is never too early to think about Christmas gifts!)

Supplies used:
Dies:  Cheery Lynn Flower strip
Punch:  Punch Bunch tiny center
Stamps:  Hero Arts, feel better soon
Glitter:  Glitter Ritz, emerald

Enjoy your weekend!
And thanks for "stamping" by,
            ~Anna

Friday, January 31, 2014

Single Layer Valentine!

Surprise - this is the second post for the day!  I wanted to get another idea out for you!


This was another very quick card, yet I have to say it looks very pretty in real life since it sparkles  oh so much. 

Again, I used one of the latest dies from Impression Obsession and added several flowers to the flourishes, stamped the saying and added stickles to the center of the heart and along the flourishes.  The stickles really makes it pop and you forget that it is all on one layer.  Quick and easy and you get your card done in a reasonable amount of time (the little flowers slow you up a bit!)

Supplies:
Dies:  Impression Obsession heart flourish,  Impression Obsession hydrangea die set (for the little flowers)
Stamp:  Hero Arts
Other:  Stickles (diamond), Viva Decor pearl pen

Thanks for "stamping" by,
       ~Anna

Monday, August 5, 2013

Cards from the His and Her Class

Good Morning Everyone!  Just wanted to post the cards that we made in the His and Hers Class.  I was able to give you tips and ideas and hopefully make you think outside the box so that you too can come up with some cards yourself.

Here is a picture of the three "His" cards.  


And here are the corresponding "female" versions of the masculine cards.

Next are pictures of the 3 pairs of cards:


Great news........You still have an opportunity to create these cards!  Join us on Thursday, August 22 at 1PM or at 6 in the evening.  You will not be disappointed!

(Don"t forget, click on each picture to see it close up)

Thanks for "stamping" by,
      ~Anna

Sunday, June 16, 2013

Happy Father's Day!

Happy Father's Day everyone! Anyone can be a father, but it takes someone special to be a dad!  Wish my dad lived closer, but we talk everyday and I'm wishing him a wonderful day. 

Just wanted to post a quick and easy card for Father's Day.


Wanted to show you a close up of the saying.

Thanks for stopping by and I hope you are having a great day with your dad!
              ~Anna

Monday, May 13, 2013

A Pair of His and Her Cards

I have been wanting to use this pretty Hero Arts/Sizzix medallion embossing folder.  Last week I dreamt of elements of this card; probably because I was on Pinterest late at night.  When I woke up, I knew that I wanted to use my Cheery Lynn butterfly die and sand the Hero Arts card stock.  (This card stock has a white core and when you sand it, the white comes through.)


I then challenged myself.  I wanted to use the same embossing folder and card stock and create a masculine version of this card.


Butterflies and cursive font tend to be more feminine, so I used the Hero Arts Alphabet die set and cut out the word "happy".  I then found a bold font for birthday (a Hero Arts stamp) and stamped and embossed it in white.  I used a Nellie Snellen set of star dies and attached it to the card.


                                                  Here are the two cards side by side. 

Now, this brings me to another class - His and Her Cards!  You will create 3 sets of cards, one female version and male version, using either the same supplies, or same sketch, etc.  This will be a fun class with lots of tips for you to stretch your supplies and think outside the box.  We always have a harder time creating a card for our male friends and this class will get you out of that rut!  Join us on Thurs, May 30 at 1PM or on Saturday, June 22 at 11AM.  Call and pre-register for the class and save $3.

Looking forward to seeing you in class!
                        ~Anna

Wednesday, February 27, 2013

Sweet Cupcake Card

I have been playing with this new cupcake stamp from Impression Obsession as well as another new die from Hero Arts.  I have found out that they work very well together! 

Here is one version:

I colored the cupcake with Copics and layered it on PART of the Hero Arts die, floral lace.  This is a very pretty die and what is really nice is that you can cut it up and use it in different ways!

In the following card, I layered the cupcake on the entire die cut.


The following are some pictures of how the die can be cut up.  Remember, you can paper piece the die back together using different colors of card stock for a really neat look!

Here you can see the entire die.  This entire die was used in the cream colored card above.
If you snip around the middle doily, you get the center die, which is what I used for the white card above. 

You can always use the outside ring for another project. (You know, use crafts can't throw anything away!) I can see cutting up the outside ring and use each "triangle" to decorate the corners of your card.


And lastly, you can use the die out in two colors and cut them up.  Next layer them back together in different colors for another look.


This should give you ideas about your other dies.  Take a look at them.  Play with them on your work table.  Layer them or layer stamped images on them.  You'll be surprised at what you see!

Have a great day and speak to you soon!
          ~Anna 

Monday, February 18, 2013

White on White with a bit of Pink

I got this new "Square Frame" die from Joy Crafts and had to make a new card.  The frame is beautiful with all the detail, a bit of lattice work and the dry embossing.  And since I love the white on white look, I started the new project with that theme in mind and am very pleased with the results.  I ended up making a birthday card, but this easily lends itself to a pretty wedding or anniversary card.

Here is another view of the card,  Hopefully you can see all of the dimension. (Of course the card looks so much better in real life.)

I used Cheery Lynn dies for the butterfly and the flowers.  (The flowers were the Cherry Blossom dies).  I added the leafy flourish from Marianne and used the Nellie Snellen punches for the 3-D leaves. 

Let me know if you want the new Square Frame.  I can mail it out to you in no time!  You are going to love it!

Thanks for stopping by and have a great day!
              ~Anna
Remember, if you click on the picture, you will see a larger and close up version of the card.

Thursday, February 14, 2013

Beautiful Chrysanthemum Die

I received the new Hero Arts "Chrysanthemum" die and had to try it out.  Here are two different looks from the one die.  I used micro fine glitter for both cards and it made it very sparkly.


I am working on another card for a third look.  It is always fun to create different looks from the same supplies.  

Stop by soon to see more new cards and new product from Hero Arts and Ecstasy Crafts.
Thanks and looking forward to seeing you soon!
                  ~Anna

Tuesday, February 5, 2013

Chevrons Made with Square Nesting Dies!

As you know, I am taking the CAS card class.  Saturday,  JJ Bolton showed us how to make chevrons with square dies!  What a clever idea and a great way to "stretch" the use of your dies!  I couldn't wait to go and try it out!  Believe me, it was as simple as she had demonstrated!  The hardest part was to evenly space the nesting square dies and tape them down.  I used "Post-it" tape and it worked wonderfully.  Another great tip was to use the same Post-it tape and lay the chevrons on it.  This way you can space them out evenly and then adhere them to your card all in one step.

When I passed the dies through my Big Shot, I ended up with 8 chevrons.  Each time I used a different color card stock, I got 8 more chevrons.  Once that was done, I only had to put the card together.  I just love this bold and modern look.

I then had to try another color combination and thought of a patriotic card for our soldiers.

Stop by if you need some extra help or tips in getting your chevrons done.  These are so addicting, you won't be able to stop making them!

Looking forward to seeing you,
           ~Anna