Showing posts with label Embossing folders. Show all posts

Friday, August 7, 2020

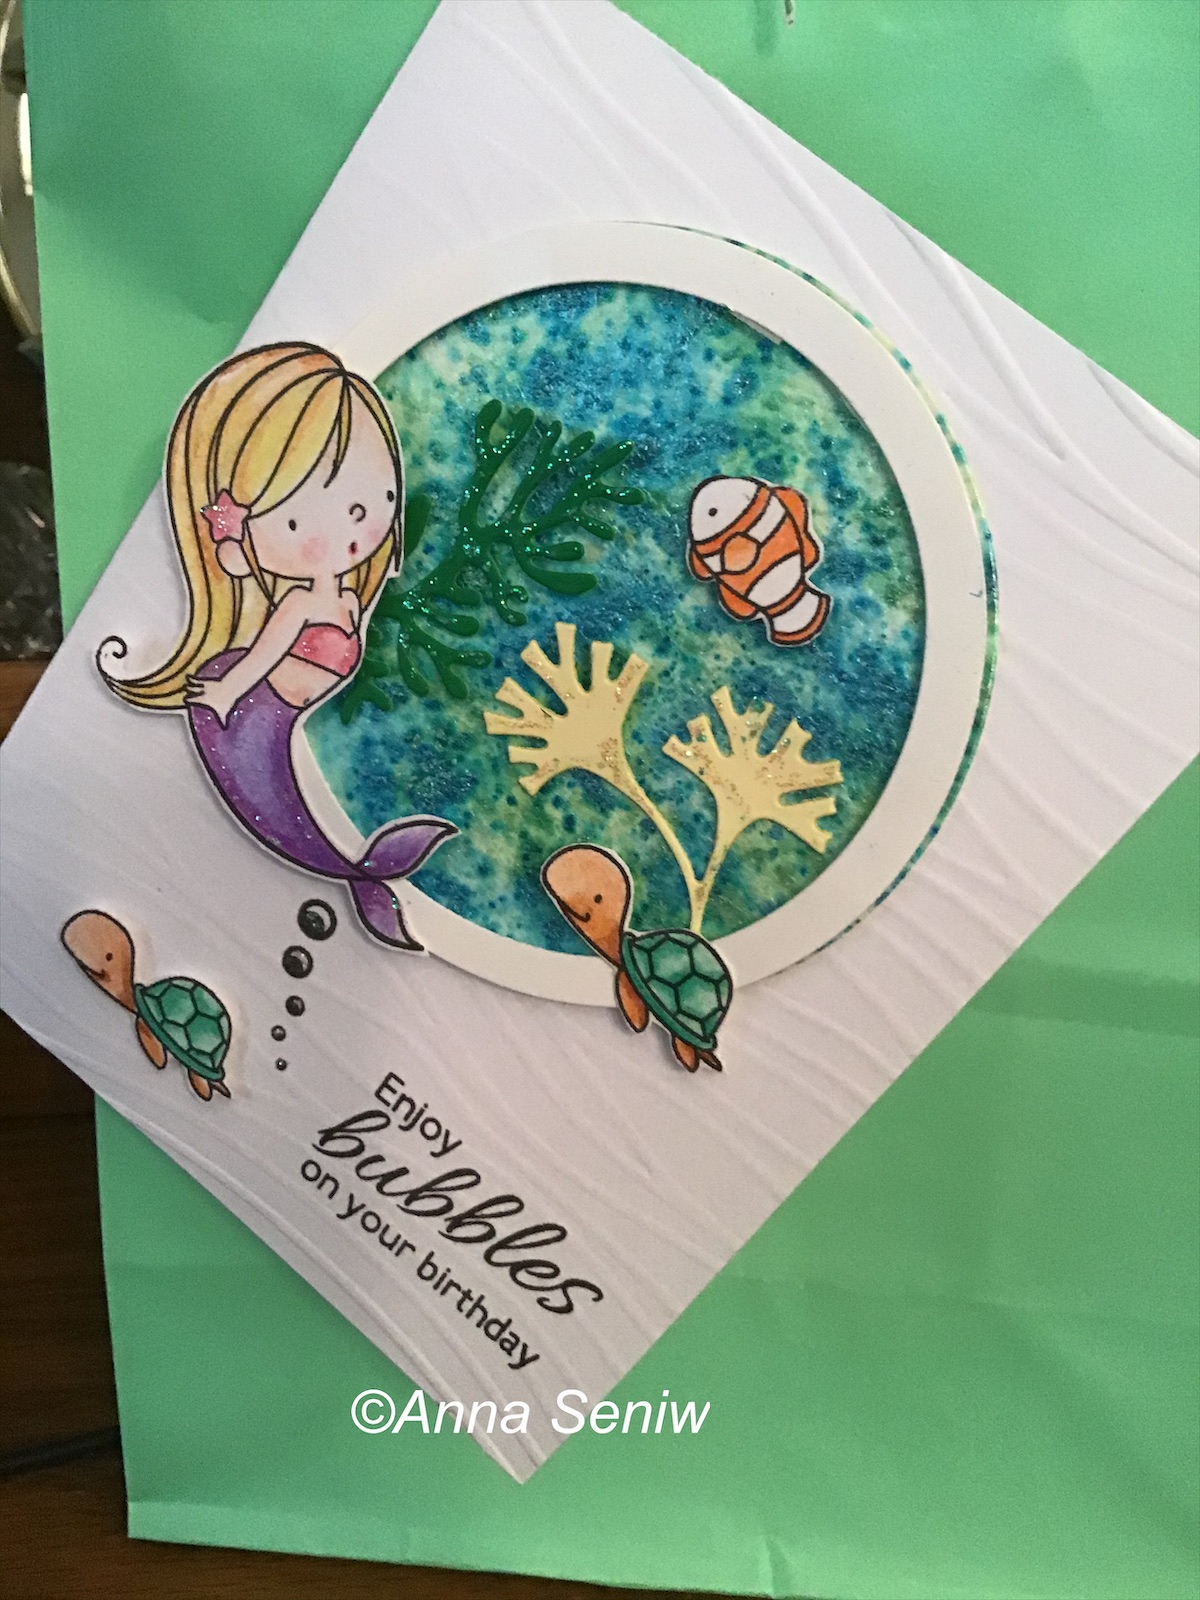
Lovely Mermaid

 Today I have a birthday card with a mermaid theme for you. When I first saw this stamp set from My Favorite Things, I didn’t think I would need it as I don’t make many kids cards. But then my friend Soni made me a beautiful birthday card with it and I just had to have it. Ha ha on me! 


This card actually is for a 5 year old. Hope she will like it.  I attached the card to the gift bag in order to quickly decorate the plain bag.

The card details: I used pixie powders on water color card stock to create the water background. Love the way they shine! And next I cut out some coral and attached the colored mermaid, turtle and clown fish. I actually have a whole bunch of items colored from that set and now that I have a card design I like, I can recreate this card pretty easily.

Supplies used: Stamps, MFT and Apple Blossom 

Cosmic Shimmer Pixie Powders: peacock green, emerald green, & aqua lagoon

Dies for the coral, Apple Blossom ( I fussy cut the mermaid, turtle and fish)

Embossing folder, SU

Stickles and Chameleon color tone pencils


Wishing you a “mermazing” day!

~Anna

Friday, July 28, 2017

Tim's Crazy Dogs

Hi All,
Hope you are enjoying your summer!

I've been having a ball with Tim Holtz's "Crazy Dogs" stamps and dies!!!

I had several different occasions to make cards; birthday, graduation, congratulations and even thank you and these fun dogs fit the bill for ALL of them!

Here they are:


Birthday card for Maria 


Graduation card for Mark


As you can see, the layout is the same for all of the cards.  I layered the pencil colored dogs on a piece of card stock that was embossed with the appropriate saying for the card.  Added some extras and most importantly added the sunglasses!!!  And don't forget to add glossy accents to the lenses to make them look shiny and like real lenses!

Hope you're having a great day and finding some time to craft!!!

Thanks for stopping by,
       ~Anna

Wednesday, September 7, 2016

Beautiful Ukrainian Poppy!

Happy Wednesday All,

It's hump day and a short work week! Yay!!!

Today I would like to share with you a poppy flower card.  Now, being Ukrainian, I was thrilled when Sue Wilson came out with the Exquisite Poppy die set; because every Ukrainian needs EVERYTHING poppies!  I myself have a large embroidered framed poppies piece (38" X 18"), silk poppies in an Ukrainian vase and even a painting of poppies! I was so excited about being able to make poppy cards now!!!

I started cutting the flowers and was not pleased at all with the way they looked. They just did not look like poppies. I tried red card stock, then white card stock. Tried molding them on my mat, and still they didn't look like poppies. I just couldn't figure out what was wrong. I was so discouraged.

I couldn't sleep because of my dilema until I thought of doing a search on youtube! I was so hoping that Sue Wilson used them in a video. And sure enough she did!  She created a beautiful card showcasing 3 poppies.  You can see the card and video HERE.

Sue's tip on cutting the poppies did the trick!!! She used crepe paper!!! Of course! It made the flower realistic and lightweight!  I couldn't wait to get to the Dollar Store the next day to get some crepe paper streamers!!!  And here is my card; the crepe paper made ALL the difference.


I'm very pleased with the way it turned out! And it's perfect for ANY occasion! 

Supplies used:

Dies:   Sue Wilson Exquisite Poppy set, Sue Wilson Olive branches, Marianne Creatables Flower filler
           Impression Obsession Rectangle 6 in 1 frame
Embossing folder:  Sizzix


The lesson here --- the right paper goes a long way!!!

Thanks so much for "stamping" by,
           ~Anna

Wednesday, August 31, 2016

Simple Birthday Cupcakes

Happy Wednesday!

Here are two birthday cards I made over this past weekend.  And literally, the stickles was drying on the second card while I jumped into the shower to get ready for the 50th party I was going to!!! LOL


I needed to make the card for a friend's 50th birthday and I thought that I was finally going to use my "tool" dies, BUT that didn't happen. The week flew by and I didn't even start with pulling the colors together. So, on Friday I decided to make a cupcake card after a browsed Pinterest over the past few days. Next our Matushka left me a message and was hoping that a had an extra card lying around for our Bishop's birthday!  I had to laugh..........as everyone knows that I have A LOT of sample cards, but not to use. Just like the shoemaker's kids not having shoes, I'm the card maker with no cards! LOL.   But I couldn't say no, I mean it was for the Bishop and I truly felt honored that Matushka thought of me. So, I told her that I did have pieces cut for a birthday card that only needed to be put together. Or since I was planning to make Bill's card in the morning, and if I liked the way it was developing, I would make another card at the same time.

Well, as you can see, I ended up making two cupcake cards! I would have loved to have made a more elaborate card for the Bishop, plus at least a 5X7 card, so that it would be big enough for everyone to sign, BUT time just didn't let that happen.

As I was creating the card, I really liked it; it is so cute!  Matushka loved it and I was very thankful!


Here are close ups; you can see the detail of the embossing folder.  


As you know, I'm so in love with the teal color combo. Also, notice that I only used strips of teal card stock underneath the saying; a great way to save on colored card stock! 
 
Lastly, the bit of stickles on the frosting and candle was just enough to make everything pop!
 
I know I will be using this layout again; it's simple, cute and pretty fast! You can make several of these pretty quickly!
 
 
Supplies used:
 
     Dies:      Marianne Creatables Cupcake die (it includes the candle and two different cupcake frostings)
     Embossing folder:     Cuttlebug Birthday Sayings
     Stamps:    Hero Arts Birthday sayings clear set
     Other:      Stickles and gems
 
 
Thanks so much for "stamping" by!
               ~Anna


Monday, August 15, 2016

Christmas Joy

Happy Monday!
Hope you are enjoying the summer and it's not too humid where you are!  We've been having a heat wave and the humidity has been horrible!  I don't remember when it was this bad.  Yesterday was better and I think it will improve slowly.  (I can't complain too much though, since I do hate the winter cold and snow!)

So, thinking about winter, I'd like to share with you a Christmas card I made and used in a class this past weekend.  I got the inspiration from Sue Wilson, the designer of the Joy die!  I saw the card she made with this die and I just fell in love with this color scheme; cream and gold is such an elegant look!  You can see Sue's creation HERE.

Sue Wilson's cards are actually beautiful pieces of art because she makes the cards quite large; usually 5X5 or 6X6.  My card is a regular A2 size card.  I didn't have a large nativity star die and so I went with the bells.  I also added micro-fine glitter to the edges and lots of stickles to the "snow" on the card.  I am really pleased with the way it turned out.


Now, Kittie Caracciolo is another talented designer and if you go to HER BLOG, you can see this die set used in the traditional red and green color scheme; very simple, yet also elegant.

This die was released in the winter of 2014, (and I finally used it! Yay!) I am happy to inform you that it is still available!  Please let me know if you want to reserve it for yourself!

Supplies used:
Dies:    Sue Wilson, Joy, Impression Obsession small Christmas charms, and small pine branches
Other:  Sizzix/Hero Arts "Snow" embossing folder, Micro fine glitter in Sahara, stickles

Thanks so much for stopping by,
       ~Anna

Monday, July 20, 2015

Birthday Cupcakes!

Hi All,  Hope you are enjoying your summer.  We've past the half way point of July :(  Boy where does the time fly?

I'd like to share with you a birthday card I made for my daughter, Maria, who loves a good cupcake.


It's a simple layout, yet it focused on the happiness of cupcakes.  I also got to use one of the new border dies from Tattered Lace, which was included in their #17 magazine.

Supplies used:
Dies:  Marianne Creatables Cupcakes die, Tattered Lace lacey border die
Stamps:  Impression Obsession "It's a cupcake kind of day"
Other:  Tattered Lace Ditsy Dots embossing folder
Card size:  4" X 8"

Thanks for "stamping" by,
             ~Anna

Friday, May 22, 2015

Happy Birthday with Gold Leafing

Happy Friday!

Today I want to share with you a simple birthday card with gold leafing for the background.


I know we had tried gold leafing years ago and sort of put it on the back burner.  Then I saw Sue Wilson using it with her dies and I said, OK, it's time to pull it out and use it again!!!

Actually, I COULDN'T find where I stashed it and so I had to re-order a container - LOL!!!  (OK, stop laughing because I KNOW you can relate!!!!)

It is so simple to use; I used the Be Creative tape and sprinkled some on and then just started to rub it in with my finger(s).  I forgot what an elegant look it gives!

And that's it!  QUICK and SIMPLE!  Love those cards!!!

Supplies used:
Dies:  Happy Birthday edge by Joy Crafts
Embossing folder:  A4 size (8 1/4" X 12") Dots embossing folder
Other: Calypso - Cosmic Shimmer Gilding Flakes

Thanks so much for stopping by and Have a wonderful and safe holiday weekend!
                                         ~Anna


Wednesday, May 13, 2015

Love those Hummingbirds

I love to sit out on my back deck and watch the hummingbirds find their way to my feeder.  It always amazes me that these tiny birds know where the food is and find it within a day of hanging the sweet nectar after a long winter!  Just think, not being around for all those months and yet they find the feeder within a day or two!!!  Truly amazing!  And the sound the wings make - I remember the first time I heard it, I thought a huge bee was buzzing around!  Beautiful Mother Nature!

You can see pictures I was able to capture of these beautiful birds HERE.

Therefore, once I saw this new flower sprig die from Leane Creatief, I knew I could use it with the pretty small hummingbird from Dee!  And I have to say I love the way it came out -- such a happy card, full of spring and color (after this long and very cold winter).


I used mulberry paper for the wings to give it a light and feathery look.  I know you all have at least one or two huge sheets of mulberry paper stashed away from days ago and now you can pull it out and use it for bird feathers!  Love it when we use our old stash!

The overall size of the card is approximately 6 inches round and by using the envelope punch board, you can make a nice, one of a kind envelope for this special card.

Supplies Used:
Dies:  Dee's Distinctively Small hummingbird left,  
           Leane Creatief Lea'bilities flower sprig,
           Marianne Craftables Passe partout - oval
          Spellbinders Grand decorative circles and classic nesting circles
Embossing folder:  8 1/4" X 12" dots embossing folder
Other:  Viva Decor pearl pen, Stickles


Thanks so much for stopping by!
               ~Anna


Thursday, March 19, 2015

Spring is in the Air with Daffodils

Happy Thursday!  Spring is clearly in the air and I wanted to share with you this pretty yet simple daffodil card.


I used this very versatile die set from Leane Creatief.  This die set has 14 pieces and allows you to  make two flowers in two sizes and two views.  It also includes the leaves, all at a very reasonable price of $18. Please, let me know if you want a set; and remember we  can easily ship this in a padded envelope to you!

And here is a picture of the die set:

Every year I pick up a bunch of daffodils at the supermarket and this year I was lucky to be able to do it for 2 weeks!  I always pick a bunch where the bulbs are mostly closed; this way they bloom for me at home and I get to enjoy them for a whole week!  When I made this card, I knew I wanted to take a picture of my vase of daffodils with my handmade card.  Hope you enjoy the look:


Now if you like this look, stop by on Saturday, March 28 for the Daffodil Card Make and Take.  

OR, you may decide to stay and make several cards in our Easter and spring cards class.

Either way you'll be ready for Easter if you do!

Thanks, have a wonderful day and celebrate; tomorrow is spring!
                                   ~Anna


Supplies used:
Dies:  Leane Creatief Lea'bilities daffodils
Stamps:  Impression Obsession Happy Easter
Embossing folder:  Leane Creatief garden tools border
Ink:  Tsukineko Versacolor Mango


Thursday, February 26, 2015

Go Yankees!

Today is the first day of spring training for the Mets and the Yankees!  This can only mean that spring is just around the corner!!!  And hopefully warmer weather!!! We so need it!

In honor of spring training, here is a fabulous box card that Cecilia Prange made for Soni last year.  I finally came around to post it!  Sorry Ceci that it took so ling and that this post got away from me. 

Now, if you know Soni, you know that she is an avid Yankees fan and just loved this surprise box card that she was able to display through the entire baseball season!


Ceci gave us some tips: she went to the Party Store and was able to get Yankee themed wrapping paper and some other goodies to fill the box.  (The wrapping paper was very economical with lots of pictures that she was able to cut out and use.)

Here are some more views:


Ceci also used some Cheery Lynn dies as well as Marianne, Joy, and HeroArts dies, and even some punches.  It's a birthday gift in itself!

Now I know what I'll create for my brother for his birthday!  Though it will be Mets themed!  Go Mets!

Thanks for stopping by and have a great day!
                ~Anna

Sunday, February 22, 2015

One Die, Two Looks

Happy Sunday!  And it is finally sunny and quite warm (high 30's) after being in the negative digits!!!  As I say each day, we're ONE day closer to spring!!!

Today I want to show you two cards I completed with the same border die.


This card was inspired by Kittie Caracciolo.  You can see the card she made HERE.  I just love her work and when I saw the card she made with this border die (Sue Wilson's French collection border and tag set), I just had to get the die set!

I tried several flowers and they just didn't work.  Then I came across this Cheery Lynn Frangipani flower die, and I imagined that it should work.  I also love this flower because it reminds me of my many happy times in Barbados!  After I finished the card and looked on line at the flower again, I realized that I should have curled it a bit differently.  I will try improving the look of this flower in the next card I make.  But all in all, I like the look of this card - it just makes me smile and feel happy!  Hope it does that for you too.


The second card was inspired by Sue Wilson herself.  I watched a video where she demonstrated using not only the border but the card stock that is left behind.  I liked the look and tried it out here.  I added micro fine "cool highlights" glitter to the background of the card and it truly gives it a nice sparkle.  I even created a border by piercing the layered card stock; also a favorite detail of Sue Wilson. 

Supplies Used:
Dies:  Creative Expressions Sue Wilson French Collection border, corner and tag die set and Vinery Petite set,  Cheery Lynn Frangipani flower set, baby's breath set and Chrysanthemums, Dee's Distinctively With Love words, Marianne's open flower and leaf
Other:  Micro glitter ritz in cool highlights, Viva Decor pearl pen, Copic markers

Spring is on it's way and we can even see it in our card creations!
Have a wonderful day!
          ~Anna

Monday, February 9, 2015

Love is in the Air

Join us for a cute Valentine Make and Take this Saturday, February 14th.


This owl stamp from Lawn Fawn is so cute and even though it comes in a Christmas stamp set, it can be used for any winter occasion.

Supplies used:
Stamp:  Lawn Fawn
Dies:  Impression Obsession Bare branch and heart border, Dee's Distinctively With        Love, Spellbinders Classic Circles nestabilities
Other:  Marvy tiny heart punch, Copic markers, stickles

Hope this card warms your heart and makes you feel warm on this cold and snowy day.
Thanks for stopping by,
             ~Anna

Thursday, January 22, 2015

His and Her Get Well Cards!

As promised, more get well cards for you!

I really liked how this card came out.  It's clean, simple and puts a smile on my face! And hopefully, it will put a smile on the patient's face.


The only thing that started to bother me was that it does look a bit feminine.  Of course, that is only natural because I'm a woman who likes pretty colors, hearts and flowers and I am drawn to replicate that in my work!  The next day though, these thoughts were still swirling around in the back of my mind when the idea of stars came to me.  What about changing out the hearts for stars and changing the color combo.   And so, my mind began to race and I couldn't wait to get home and try it out.  (I just love it when an idea just pops into your head - and this all happened while I was driving on my lunch break!)  Here is the masculine version --- what do you think?

And here are the two cards, side by side ---

(Both cards are the same size - 3 1/2 X 5.  It's just an optical illusion that the white one looks bigger.)

Hope this gets your creative juices flowing!
                    ~Anna

Wednesday, January 21, 2015

Simple and Fun Get Well Cards

Hello Stamping Buddies!
It's the middle of January in the northeast and it seems like we are getting some kind of snow or ice once a week now and I just hate that.  But in turn it gives us time to be indoors and craft (yay)!  See, there's always a plus side!

Lawn Fawn has two great stamp sets with coordinating dies that can be used for some very cute get well cards.  If you know me, you know I don't take meds, unless it is totally necessary, but I just LOVE the little prescription bottle in the "Get Well Soon" stamp set!  It's just so cute - and here is the card that I came up with:

For my second card, I used Impression Obsession's "Under the weather" stamp, and umbrella & cloud dies.  The card is only 3 1/2 X 3 1/2 and perfect to be attached to a gift bag with some goodies for the patient!


There you have it!  These are two of the cards that you will be able to make in the Get Well Cards class.  Check us out tomorrow for more Get Well Cards!

Thanks for stopping by and we look forward to seeing you soon!
                       ~Anna

Friday, December 5, 2014

Sweet Christmas Wishes Topped with Love

Love this cute card - the Make and Take for this weekend's Christmas Open House.


Supplies used:
Dies:  Impression Obsession's take out coffee and Christmas charms sets
Stamp:  Impression Obsession
Other:  Stickles, smallest Marvy's heart punch, Sizzix/Hero Arts snow embossing folder, peel offs

Looking forward to seeing you!
                 ~Anna

Friday, October 24, 2014

A Clean and Simple Christmas Angel Card

I love angels and the Impression Obsession new angel die set makes two pretty angels perfect for Christmas cards.

The gold card stock makes this card very regal and yet the design is simple enough that you can mass produce it.

If you haven't started your Christmas cards, hope this gives you the inspiration to start!  Christmas will be here before we know it!!!

Supplies used:
Dies:  Impression Obsession angel set, Spellbinders floral ovals
Stamp:  Joy to the world
Embossing folder:  Joy crafts

Thanks so much for "stamping" by,
                    ~Anna

Tuesday, October 14, 2014

A Beautiful Christmas Cardinal

Happy Tuesday!
I finished this card for the Christmas card class this past Sunday and finally got around to take a picture of it! 

I just love this beautiful cardinal!  

You know, there are some cards that you finish and you truly love the way it turned out.  Well, this is one of those cards!  I have it sitting on top of the small TV in the kitchen so that I can enjoy it while I have my meals!

Everyone in class loved this card also - it is simple yet very elegant.  The cardinal is just gorgeous and the 3 wings layered onto the body gives it so much depth.   The bit of diamond stickles gives the whole card a pretty sparkle.

Here you can see the detail and depth of the card.  I think I will be making several of these this Christmas.  Even though this is a simple design, it does take a bit of time with all of the cutting and building of the layers, but it is soooo pretty!

Let me know if you would like this cardinal die, as I will be ordering more of them this week.  I want to make sure I get enough and that no one will be left out!

Supplies used:
Dies:  Dee's Distinctively Dies right facing cardinal, Impression Obsession pine branch, Spellbinders floral ovals and classic ovals
Other:  Sizzix snow embossing folder, Diamond stckles, Copic markers

Enjoy the warmer weather!  It'll be cold soon enough!
                          ~Anna

Sunday, July 6, 2014

The Elegant Chantilly Bow

Happy Holiday Weekend!

Hope you are having a wonderful holiday weekend.  I celebrated the 4th by setting aside some time for myself to play with the chantilly bow die from Tattered Lace.  I have been wanting to create with this die for quite some time but time seems to keep getting away from me!

I had a layout in mind and even the color scheme of white on white with teal as the accent.  Teal is becoming my new go to color this summer.  I even picked up a few new kitchen towels with teal in them!  I think because it reminds me so much of the beautiful Caribbean sea and how much I love sitting on my favorite beach in Barbados and taking in the stunning scenery.  I am so grateful that I was there just a few months ago for Maria and Gary's wedding.  So many wonderful memories and..........dreaming of my next visit.

OK, now back to reality and my card ------

I cut the pretty bow die twice - once in teal (Hero Arts pool card stock set) and once in white.   I cut the white bow in order to layer it differently underneath the teal one.  I also used the new 5 X 7 embossing folder (delicate hearts).  I picked a white rose that I had already made previously and added it to the center of the bow.  I am so pleased with the outcome. It is so pretty and really can be used for so many occasions.  And it was a QUICK card!  I only fussed with the bow - curling it a bit and raising it when adhered it to the card.  The finishing touch was made with a Viva Decor pearl pen.

Here is a side view so that you can see the layers, depth and detail of this card ---


Now, onto my next creation.  Well, actually, it's off to work soon!  But, hopefully I will have some more time this week to create some new cards for your inspiration.

Supplies used:
Stamp:  Hero Arts
Dies: Tattered Lace chantilly bow, Cheery Lynn cuties 2
Embossing folder:  Delicate hearts
Ink:  Brilliance pearlescent jade
Other:  Viva Decor pearl pen


Thanks so much for "stamping" by
    and have a wonderful Sunday!
                    ~Anna

Tuesday, May 13, 2014

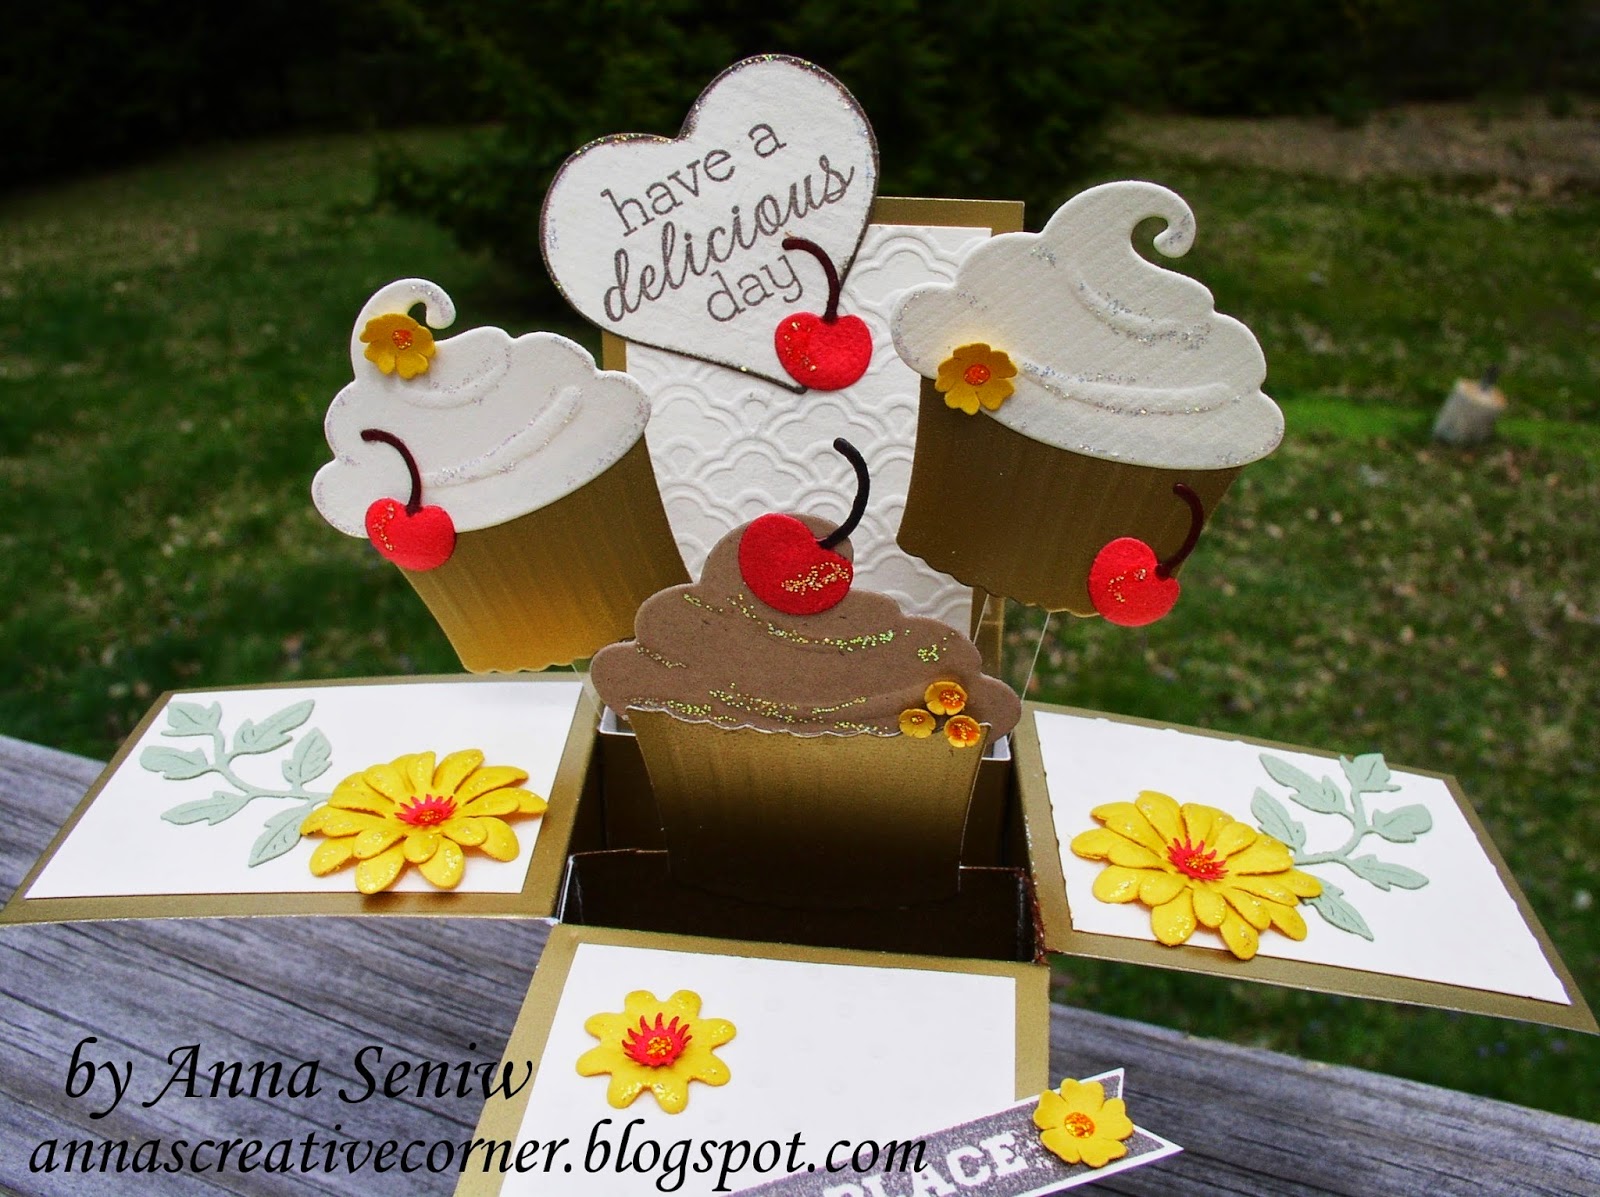
Cupcakes Galore

Yay cupcakes!  I don't think that there is anyone out there who doesn't like cupcakes!  And of course I decided to make a pop up card in a box with cupcakes and cherries!

I used gold, chocolate and cream colored card stock (it may look white, but it's cream for vanilla) to make the cupcakes.  The Marianne Creatable cupcake die set includes a cherry, a candle and a flower die; perfect for decorating the yummy snacks.


I decided to use the saying, "My Happy Place" - perfect for any occasion.  I have to laugh because when I think of the saying, "go to your happy place", I think of the movie, Happy Gilmore!  LOL!   I believe that cupcakes can be a happy place for many!

Supplies used:
Dies:  Marianne Creatables cupcakes set
            Nellie Snellen multi frame heart dies MFD 022
           Joy Crafts daisy set
           Cheery Lynn - flourish leaf strip, baby's breath flower kit
Stamps:  Hero Arts

Thanks for "stamping" by
    and I hope you're enjoying the nice weather we're finally having!
                                                ~Anna

Sunday, April 20, 2014