Showing posts with label Copic Markers. Show all posts

Sunday, February 22, 2015

One Die, Two Looks

Happy Sunday!  And it is finally sunny and quite warm (high 30's) after being in the negative digits!!!  As I say each day, we're ONE day closer to spring!!!

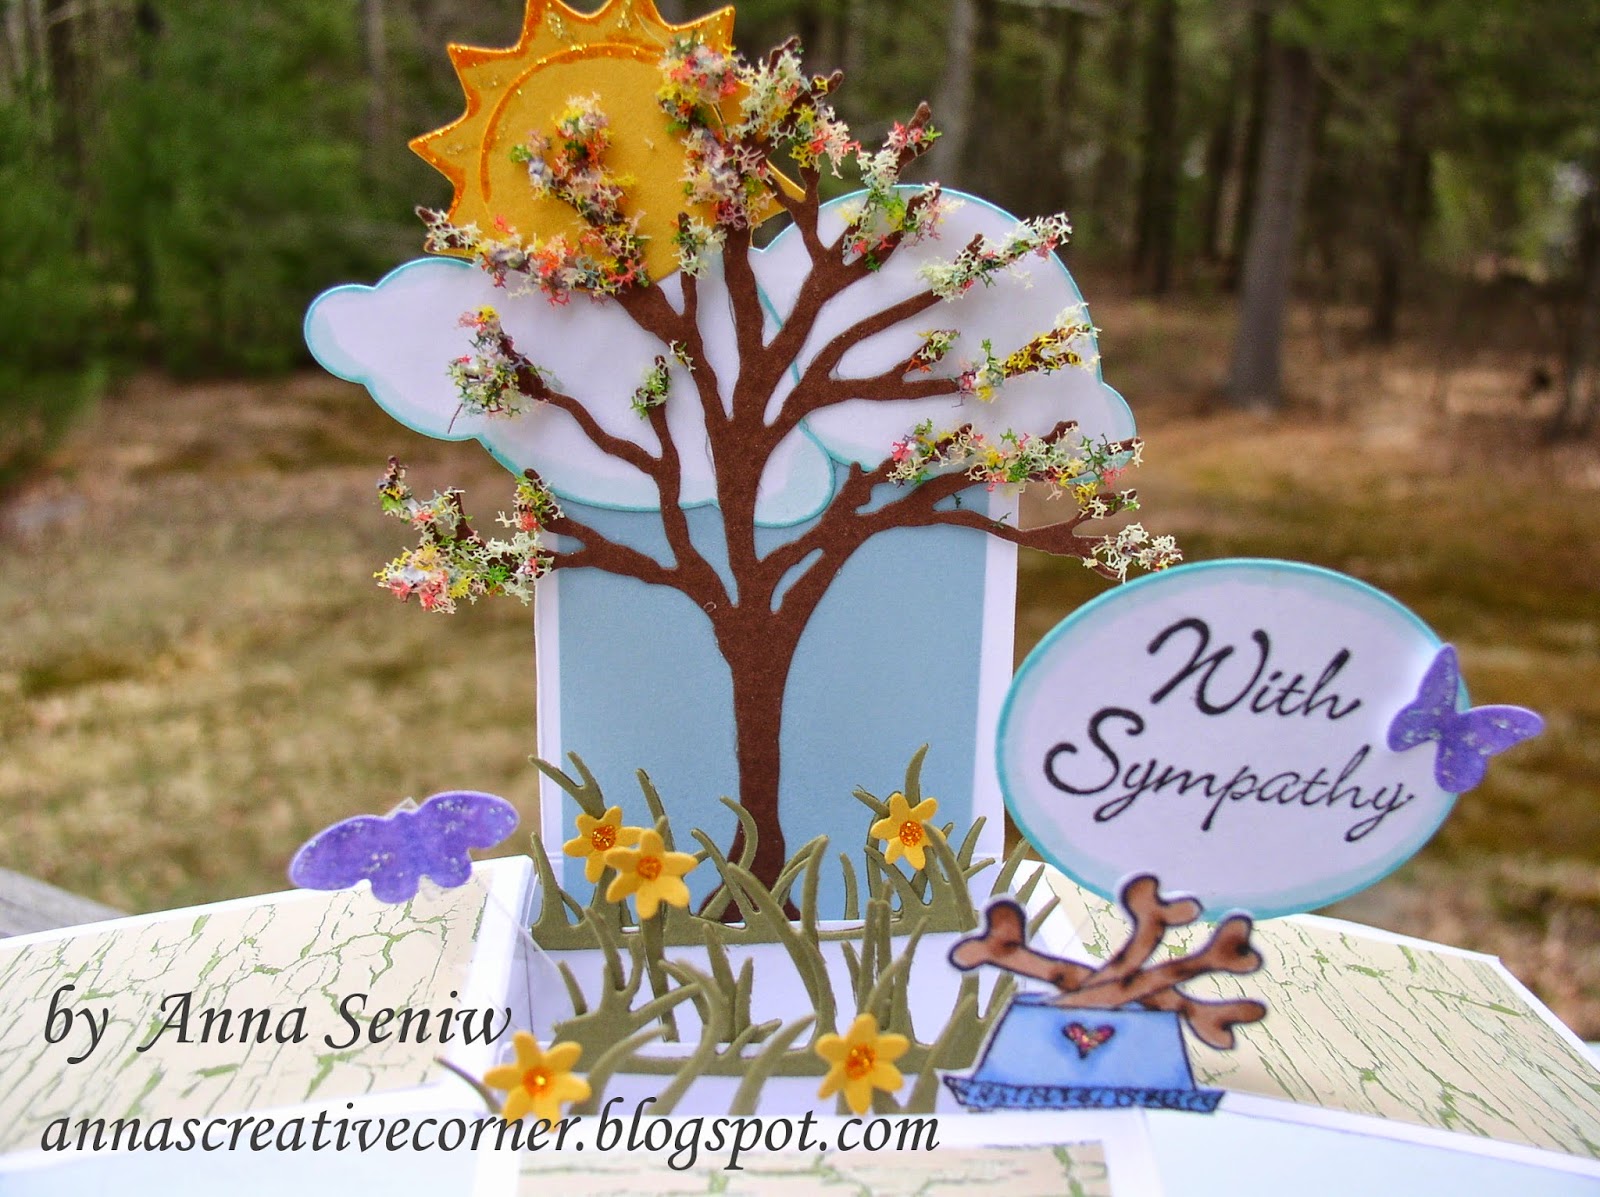
Today I want to show you two cards I completed with the same border die.


This card was inspired by Kittie Caracciolo.  You can see the card she made HERE.  I just love her work and when I saw the card she made with this border die (Sue Wilson's French collection border and tag set), I just had to get the die set!

I tried several flowers and they just didn't work.  Then I came across this Cheery Lynn Frangipani flower die, and I imagined that it should work.  I also love this flower because it reminds me of my many happy times in Barbados!  After I finished the card and looked on line at the flower again, I realized that I should have curled it a bit differently.  I will try improving the look of this flower in the next card I make.  But all in all, I like the look of this card - it just makes me smile and feel happy!  Hope it does that for you too.


The second card was inspired by Sue Wilson herself.  I watched a video where she demonstrated using not only the border but the card stock that is left behind.  I liked the look and tried it out here.  I added micro fine "cool highlights" glitter to the background of the card and it truly gives it a nice sparkle.  I even created a border by piercing the layered card stock; also a favorite detail of Sue Wilson. 

Supplies Used:
Dies:  Creative Expressions Sue Wilson French Collection border, corner and tag die set and Vinery Petite set,  Cheery Lynn Frangipani flower set, baby's breath set and Chrysanthemums, Dee's Distinctively With Love words, Marianne's open flower and leaf
Other:  Micro glitter ritz in cool highlights, Viva Decor pearl pen, Copic markers

Spring is on it's way and we can even see it in our card creations!
Have a wonderful day!
          ~Anna

Monday, February 9, 2015

Love is in the Air

Join us for a cute Valentine Make and Take this Saturday, February 14th.


This owl stamp from Lawn Fawn is so cute and even though it comes in a Christmas stamp set, it can be used for any winter occasion.

Supplies used:
Stamp:  Lawn Fawn
Dies:  Impression Obsession Bare branch and heart border, Dee's Distinctively With        Love, Spellbinders Classic Circles nestabilities
Other:  Marvy tiny heart punch, Copic markers, stickles

Hope this card warms your heart and makes you feel warm on this cold and snowy day.
Thanks for stopping by,
             ~Anna

Wednesday, January 21, 2015

Simple and Fun Get Well Cards

Hello Stamping Buddies!
It's the middle of January in the northeast and it seems like we are getting some kind of snow or ice once a week now and I just hate that.  But in turn it gives us time to be indoors and craft (yay)!  See, there's always a plus side!

Lawn Fawn has two great stamp sets with coordinating dies that can be used for some very cute get well cards.  If you know me, you know I don't take meds, unless it is totally necessary, but I just LOVE the little prescription bottle in the "Get Well Soon" stamp set!  It's just so cute - and here is the card that I came up with:

For my second card, I used Impression Obsession's "Under the weather" stamp, and umbrella & cloud dies.  The card is only 3 1/2 X 3 1/2 and perfect to be attached to a gift bag with some goodies for the patient!


There you have it!  These are two of the cards that you will be able to make in the Get Well Cards class.  Check us out tomorrow for more Get Well Cards!

Thanks for stopping by and we look forward to seeing you soon!
                       ~Anna

Tuesday, October 14, 2014

A Beautiful Christmas Cardinal

Happy Tuesday!
I finished this card for the Christmas card class this past Sunday and finally got around to take a picture of it! 

I just love this beautiful cardinal!  

You know, there are some cards that you finish and you truly love the way it turned out.  Well, this is one of those cards!  I have it sitting on top of the small TV in the kitchen so that I can enjoy it while I have my meals!

Everyone in class loved this card also - it is simple yet very elegant.  The cardinal is just gorgeous and the 3 wings layered onto the body gives it so much depth.   The bit of diamond stickles gives the whole card a pretty sparkle.

Here you can see the detail and depth of the card.  I think I will be making several of these this Christmas.  Even though this is a simple design, it does take a bit of time with all of the cutting and building of the layers, but it is soooo pretty!

Let me know if you would like this cardinal die, as I will be ordering more of them this week.  I want to make sure I get enough and that no one will be left out!

Supplies used:
Dies:  Dee's Distinctively Dies right facing cardinal, Impression Obsession pine branch, Spellbinders floral ovals and classic ovals
Other:  Sizzix snow embossing folder, Diamond stckles, Copic markers

Enjoy the warmer weather!  It'll be cold soon enough!
                          ~Anna

Friday, May 9, 2014

A Peaceful Garden

Happy Friday Everyone!
Recently I was asked to create a special Mother's Day card for someone.  Pat wanted it to be a 3-D Pop up card in a box so that her mom could display it on her desk and enjoy it year round.

Pat told me that her mom's favorite color is purple;  her mom loves flowers and old fashioned hearts and she doesn't like butterflies, birds nor any insects.  So right away I felt a bit challenged since whenever I need to fill a space, I just stick a butterfly or bird on it!  LOL!

I went to work by thinking what design I could come up with.  I also flipped through my dies and saw the pretty lattice garden trellis that I haven't used yet and thought I just have to use it.  I was so glad that the width of the trellis fit perfectly into the box!  What luck!!!

And so I started to put the scene together.  I said it before and I'll say it again, it is so much fun building the scene and watching it grow.  I decided to have the flowers go up the trellis as well as some behind it and even attached some to the back of the box to give it more depth.   Pat also told me that her mom likes cats and so I added a cat to the scene.

I was so happy when Pat picked up the card today and she was very pleased.  She said I truly captured her mom.  How wonderful!

Supplies used:
Dies:  Cheery Lynn - grass border, flourish leaf strip, baby's breath flower kit, cuties 2
          Impression Obsession - clouds, sun & moon, tiny flowers, leafy branch, cat set
          Marianne Craftables - garden trellis
          Nellie Snellen multi frame dies MFD 022, MFD 020
Stamps: Just Rite
Other:  Stickles, Copic markers

Thanks so much for "stamping" by
and have a wonderful weekend celebrating Mother's Day!
                                 ~Anna

Saturday, April 26, 2014

Another 3-D Pop Up Card in a Box!

My good friend Maryanne lost her beloved dog recently and I wanted to create something special for her. I decided on a card in a box and presented it to her yesterday.  She was very surprised and so sweet by promising to display and keep this card by Teddy's urn.


I truly enjoyed making this scene in the box; it was a lot of fun picking the various components and watching it all come together.  These 3-D scenes are addicting!

If you are curious how to make these 3-D pop up cards in a box, please join us on Saturday, May 17 and create 2 such great cards!  These are so very popular now; don't miss out on the chance to learn how to create them!  Please call and reserve your seat today!  You will not be disappointed.

Supplies used:
Dies:  Impression Obsession bare tree, clouds, sun & moon set, butterfly set, & tiny flowers set
Cheery Lynn grass border, Spellbinders classic ovals and labels 4
Stamps: Impression Obsession sympathy sentiments cling set
Other:  Copic markers, Flower Soft, & stickles

Hope you have a wonderful weekend,
               ~Anna

Monday, April 7, 2014

Welcome Spring with a 3-D Pop up Card in a Box!

Good Monday Morning!
Saturday, we had a class where we made these 3-D Pop up cards in a box.  A fun time was had by all and thank you for making it such a huge success!  I truly had so much fun creating this spring themed sample.  And then I enjoyed seeing everyone putting their special artistic touches on their creations!


I will be submitting my creation in Impression Obsession's You are my Sunshine challenge.

Supplies:
Stamps:  Impression Obsession Blooming Spring B5423
Dies:  Impression Obsession's Bird House set DIE 156-H, Sun & Moon DIE 163-C, Clouds DIE 068-A, Small Bird set DIE154-A, Rabbit set DIE168-C,Butterfly set DIE 046-A, Cheery Lynn's Nesting Eggs
Other:  Stickles, Copics, acetate strips

If you missed learning how to make these neat cards, join us Saturday, April 12th for a repeat performance! Call and reserve your seat today.

Thanks for "stamping" by,
          ~Anna

Saturday, January 25, 2014

Valentine Sundaes

Hello, hello hello!

Sorry that I have been under the radar.............I'm glad to be back and today I have a special card to share with you!

I have seen this ice cream sundae stamp used by the Impression Obsession design team and thought how cute; I need to try something with it and so I stamped it several times and took out my Copics and started coloring.  It took a few tries to come up with the right colors and then I cut two out and started to play with a layout.

The Cheery Lynn doily gives it an old fashioned look and the hearts of course make you think of Valentine's Day.  But if you don't want to use this for Valentine's Day, it would be perfect for a birthday; especially for kids and teenagers.  And what about for those of us who remember sitting in an ice cream parlor and sharing a sundae with that special someone!

Hope this inspires you to start thinking about V-Day!  It will be here before we know it!

Supplies used:
Stamps:  Impression Obsession and Just Rite
Dies:  Cheery Lynn doily, Nellie Snellen nesting hearts, Impression Obsession heart border (I used the tiny hearts that fell out from the heart border.  Will now have to think of another card to actually use the heart border)
Other:  Copics, stickles

Thanks for "stamping" by,
       ~Anna

Monday, November 25, 2013

Another Nature Themed Christmas Card

Good Morning Everyone!
This year it seems like everyone is using forests and deer in creating beautiful scenes for Christmas.  I did create a tag with birch trees and deer and you can see it HERE.  This time I used tiny cardinals and Dee's snow covered tree die to create the following scene:

I have to say, I really like the way it turned out and am truly enjoying creating these scenes.  It is so relaxing to play with the pieces and watch the scene develop.

And don't forget to decorate the inside of your card!


With this unusual Arctic cold snap with snow showers we are having, this card is just perfect!

Supplies used:
Dies:  Dee's Large snow covered tree, garland and mini stars
          Impression Obsession Birch trees and Merry Tree
Embossing folder:  Sizzix
Copic markers:  Cool grays, black, reds

Thank you for stopping by and keep warm!
                ~Anna

Wednesday, October 9, 2013

A Snowy Wintry Forest Scene

Tags, tags and another tag!  I had fun creating this wintry scene tag and the birch trees die and the deer trio from Impression Obsession were perfect for the task. 

I used distress ink and copics to add color and stickles put the finishing sparkly touch to the project!

Get into the fun and create some tags!
Have a wonderful day!
        ~Anna

Supplies used:
Dies:  Impression Obsession Birch trees (comes with 2 birds), Impression Obsession Deer trio
Embossing folder:  Sizzix
Copics:  Cool grays, browns, reds
Distress ink:  Antique linen
Other:  Nellie Snellen Duo punch of tiny flower & butterfly, stickles

Friday, May 3, 2013

May Flowers

It's May, it's May, the merry month of May!  And I always think of flowers and Camelot!  Remember the fun song with all the maidens dancing?  It always puts a smile on my face.

I just love Julie Andrews' voice, but when I think of Camelot,  I also reminisce of my daughter's high school production of it.  I was at awe when I saw it; Rachel Waldren was wonderful as Guenevere, JJ Hansen was King Arthur and Greg Biccum was Sir Lancelot.  Their voices were awesome!  The WHOLE production was just FANTASTIC; you couldn't believe that it was a high school production!  I know that Maria must be smiling while reading this! (Or at least I hope so.)  I also can't believe  that it was more than 10 years ago!  Which reminds me, I better send out the video tape to have it digitized!  Well, enough of reminiscing, and let me tell you about today's card.


I went through my large envelope of stamped images that I have already colored or partially colored.  It was time to put a card together!  And since the weather has been so nice, I pulled out this pretty image from Impression Obsession.  I was drawn to the pretty umbrella and the old fashioned flower cart.  I used Copics to color the image and I paper pieced the umbrella.  I added two layers of foam tape to the center of the umbrella and then adhered the ends straight to the card.  This gave the umbrella a realistic curved look.  Since the image is so large, I just layered it onto a pretty Spellbinders rectangle and added some die cut flowers, flourishes, and butterfly for some depth and interest.

Thanks for walking down memory lane with me and I hope it gave you some inspiration to create some "flower" cards!

Looking forward to seeing you and your creations!
                     ~Anna

Wednesday, February 27, 2013

Sweet Cupcake Card

I have been playing with this new cupcake stamp from Impression Obsession as well as another new die from Hero Arts.  I have found out that they work very well together! 

Here is one version:

I colored the cupcake with Copics and layered it on PART of the Hero Arts die, floral lace.  This is a very pretty die and what is really nice is that you can cut it up and use it in different ways!

In the following card, I layered the cupcake on the entire die cut.


The following are some pictures of how the die can be cut up.  Remember, you can paper piece the die back together using different colors of card stock for a really neat look!

Here you can see the entire die.  This entire die was used in the cream colored card above.
If you snip around the middle doily, you get the center die, which is what I used for the white card above. 

You can always use the outside ring for another project. (You know, use crafts can't throw anything away!) I can see cutting up the outside ring and use each "triangle" to decorate the corners of your card.


And lastly, you can use the die out in two colors and cut them up.  Next layer them back together in different colors for another look.


This should give you ideas about your other dies.  Take a look at them.  Play with them on your work table.  Layer them or layer stamped images on them.  You'll be surprised at what you see!

Have a great day and speak to you soon!
          ~Anna 

Monday, December 31, 2012

Sweet Treats for a Happy New Year!

Hi Everyone!  Hope you had a very Merry Christmas.......I had a wonderful time in Virginia visiting Maria and Gary. 

First I want to show you some treat bags I made using the great Fawn Lawn stamp set Making Frosty Friends.  (Remember, I made a cute card with this stamp set, see it HERE). 

 They came out so cute and they were quick to make.  Just some coloring with Copics, some basic masking, and then just attached it to a decorative square die.

This is a close up of the snow people.

Now, for some fun stuff;  I want to show you some pictures from my trip.  On Christmas Eve, besides going to church, we went to Mount Vernon, George Washington's  Estate, Museum and Gardens.


Here's hoping you are enjoying this time with family and friends.
Stay warm, be safe and have a Happy and Healthy New Year!
               ~Anna

Sunday, November 25, 2012

Cute Snowman Make & Take for Saturday!

Hello Everyone!!!
Isn't this card just too cute?

Join us this Saturday, December 1, for our Annual Christmas Open House and you too can create this great card! 

It's made with a new company, Lawn Fawn and they have so  many cute sets!  Their blog has loads of ideas.  Check them out HERE.  You can create some quick and simple cards with these stamps and have lots of fun at the same time!

I had so much fun making this card.........the set includes lots of elements to personalize your snowman!  Just check out the stamp set!.  It reminded me of the build a flower die sets, only I was building a snowman!


I'll be looking forward to seeing you at the Open House...........where we'll have refreshments, Make & Takes, specials and just good old fashioned Christmas cheer!

        ~Anna

Wednesday, October 17, 2012

Great Christmas Tags

Thought I'd get you into the Christmas mood with these great tags.  They were fun to make and will make your gift truly stand out!

Here, I used Stacy Stamps, Mini Poinsettia and attached it to the middle of a JustRite Christmas Ornament stamp. The poinsettia was colored with Copics and the ornaments were cut out using Spellbinders 2010 Heirloom Ornament dies.  To make it all sparkle, I used stickles!

For the next tag, I used JustRite, O Christmas Tree stamp set.  I also stamped the Holly Background with Hero Arts and then used the matching embossing folder to give it lots of dimension.  This is a wonderful set from Hero Arts and Sizzix!
I also saw somewhere that someone had used a part of a rosette and so I tried it here, using one of the smaller rosette's from Tim Holtz.  Also used lots of stickles and Elizabeth Crafts, Canadian Blue micro fine glitter for the finishing touches!

For the third tag, I used Dee's Candle die (from Elizabeth Crafts), the pine punch from Nellie Snellen and Spellbinders Large Ovals. 
Of course, stickles was added to the pine branches and the flame.  It's a simple design yet impressive.

Hope this gives you some ideas for the upcoming holidays and get you started on your projects.  Christmas will be here before you know it!

Thanks for stopping by,
       ~Anna

Saturday, September 29, 2012

Christmas Martini

I fell in love with this Impression Obsession stamp, Christmas Martini ever since I saw Jenny Gropp's card last year.  Therefore, this year I couldn't wait to get the stamp and use it!

Here is Jenny's card.........isn't it fun!  And check out her blog for a list of Copics that she used.


I started coloring some martinis and thought, wouldn't it be fun to make martinis for different holidays throughout the year?  Change up the colors, cover up the holly,  change the layout and you could be in martinis for a very long time!  (Hmm, not a bad thing!)

So, for Halloween, here is my fun card:

(Don't know if you can see in the photo, but I used glossy accents to make the glass shiny.)

And for fall, I made this card:

I used my tiny floral and leaf punches to cover up the holly.  I added some distress stickles to the centers of the flowers as well as the center of the candy.

I already colored "Lemon drop" martinis and will post that card as soon as I put it together.

Really, you have to try this.........it is so much fun!!!  Just coloring and thinking up different drinks!!! 

Here's the stamp that started it all:


 One little stamp, sooooo many drinks!!! 

Would love to see what you come up with!

Thanks for "stamping" by,
        ~Anna

Tuesday, August 7, 2012

Pretty Outlines Flower Basket

Here is another example of stretching the use of your stamps!  Soni made this gorgeous card using the Outlines stamp, Spring Basket.  It really is an image of an Easter basket with Easter eggs, but if you cover the Easter eggs, you just have a wonderful basket full of flowers perfect for spring, summer and even fall (if you choose fall colors for the card)!

This colorful card is great for so many happy occasions.

Here, you see the actual image with the Easter eggs in the center; where Soni covered the eggs with flower and leaf punches.  Not only did the flowers and leaves cover up the eggs, it also gave it more depth.

We still have this and several Outlines stamps in stock.  Now is the time to get your Outlines stamps!   Outlines has closed their doors and once these stamps are gone, they will be gone for good!  Stop by and pick yours up today!

Have a wonderful summer day!
            ~Anna

Monday, June 18, 2012

Round Wall Hanging

Good Morning Everyone!
Hope you had a wonderful weekend and got to spend some time with your Dad!  I did the next best thing......talk with my Dad on the phone.  He was happy and he did get to celebrate with my brother and his family.  It's hard when family don't live close by, but I take what I can!

Now, back to crafting.  I finished the round wall hanging and am very pleased by the way it came out.

I wanted to keep the color palette simple and I love white on white with some color; this time I chose pinks and a pale green..

The fabric was a wonderful find and I wanted you to see a close up of it.  See the beautiful texture and even an embossed rose in random places!  The paper flowers came out so nice using the Cheery Lynn Sweet Williams dies as well as all the sizes of the Roses (B152, 154, & 155).  I am sure you recognize the Hero Arts butterflies that I colored with Copics and added stickles for sparkle!

I am sure you will agree that this would make a great bridal shower gift or a wonderful gift for your own wall!

Join us Saturday, June 30th and complete this stunning project yourself.  Call to reserve your seat today.  Also remember, these dies are in stock, pick them up now if you can't wait til the end of the month!

Thanks for "stamping" by!
        ~Anna

Tuesday, June 5, 2012

Round Zentangle Card with a Pretty Butterfly

Zentangle is so much fun, relaxing and even addicting.  It seems once you start, you just can't stop.  You want to try more and more patterns (tangles) and see how they can work together.

I decided to make a round card this time and add some color with a pretty butterfly.  I cut out the white "doughnut" from Spellbinders classic circles and covered it with 3 tangles.  I then layered it onto a black scalloped circle and added the butterfly that was colored with Copics.

I think this makes a very unique and pretty gift tag.

Thanks for "stamping" by,
         ~Anna

Wednesday, May 2, 2012

Pretty Birdhouse Shaped Card

It's May and this Saturday is the first Saturday of the month; which means it's Make & Take Saturday!  Join us and you too will be able to create this pretty birdhouse card that says, "There's no place like home."


You will use the latest stamps and die from Impression Obsession.  Add the Tim Holtz embossing folder, some distress inks, some colored pencils or Copics, Viva Decor Pearl Pens and stickles for embellishments and you'll have a unique card!

Now these house shaped cards are so awesome because they can be used for so many occasions!  Just think, "Good Luck in your New Home", We've Moved" or what about using the door and window dies (also from I/O) and create a "Christmas Front Door"!  The possibilities are endless!

Looking forward to seeing you Saturday for this fun project!
                                    ~Anna