Showing posts with label Cutting dies. Show all posts

Friday, August 7, 2020

Lovely Mermaid

 Today I have a birthday card with a mermaid theme for you. When I first saw this stamp set from My Favorite Things, I didn’t think I would need it as I don’t make many kids cards. But then my friend Soni made me a beautiful birthday card with it and I just had to have it. Ha ha on me! 
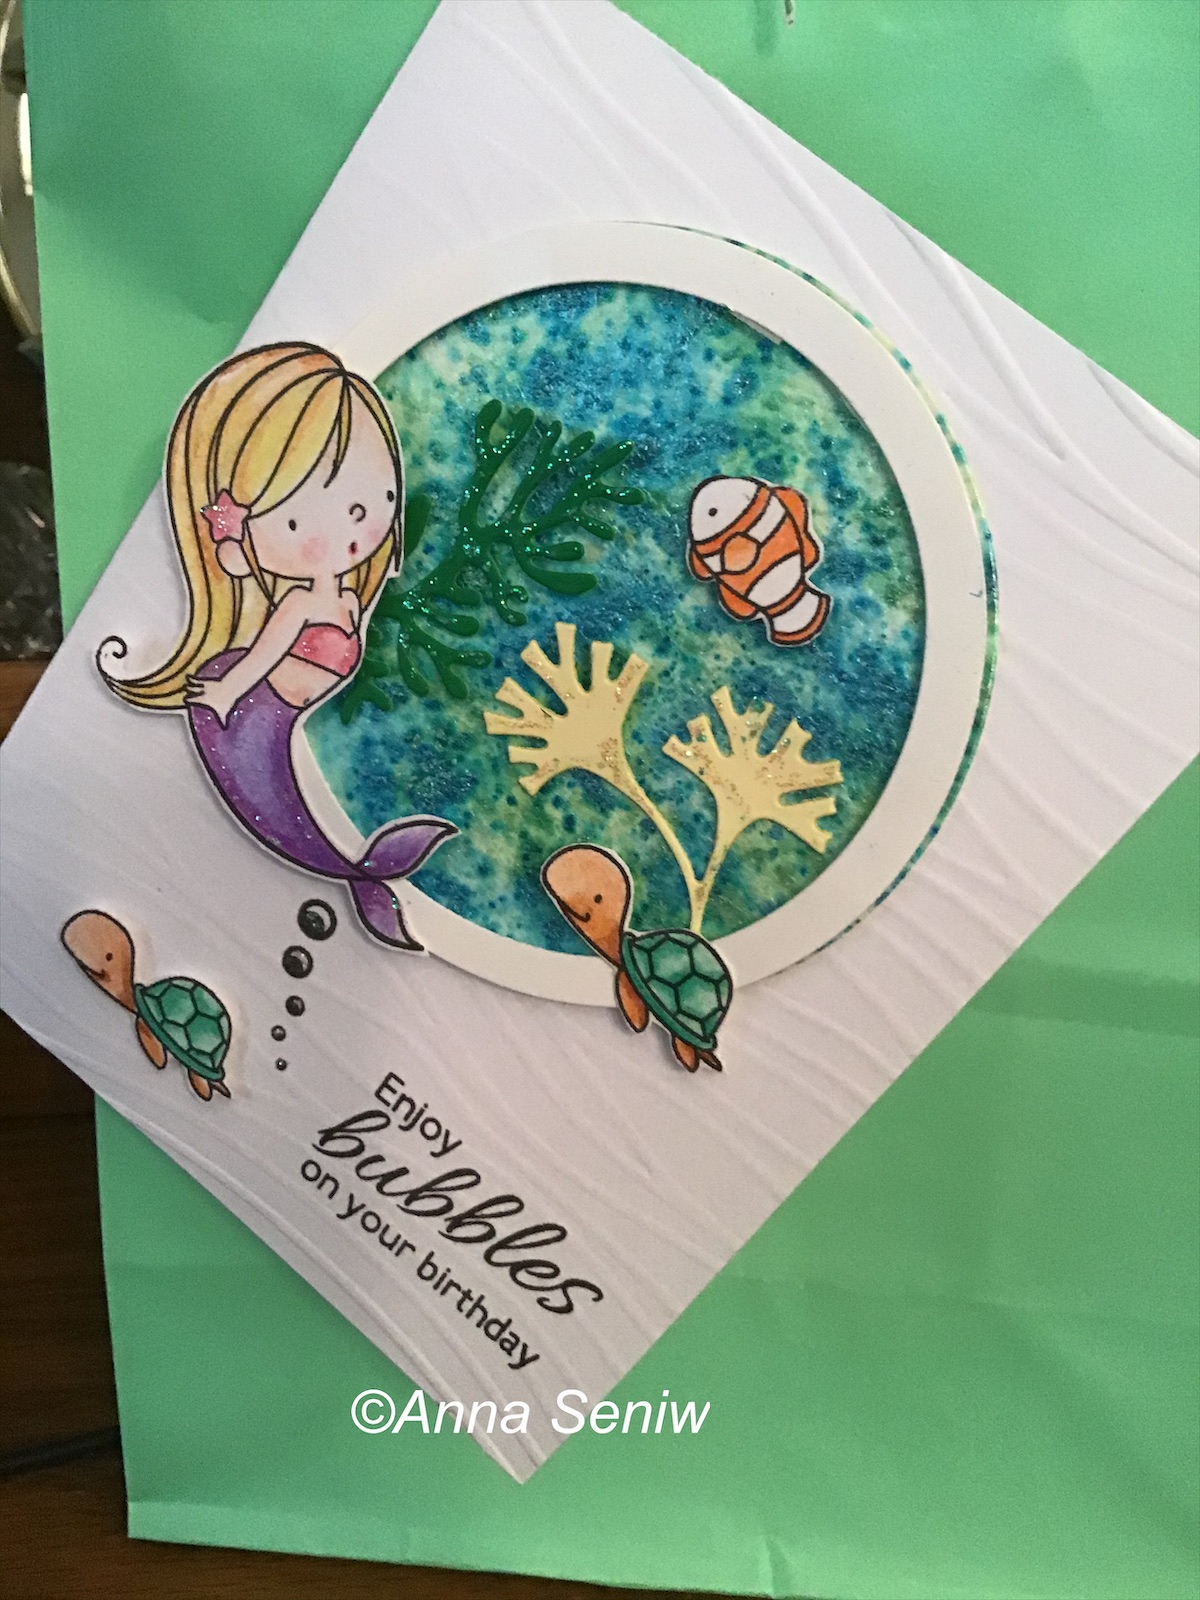


This card actually is for a 5 year old. Hope she will like it.  I attached the card to the gift bag in order to quickly decorate the plain bag.

The card details: I used pixie powders on water color card stock to create the water background. Love the way they shine! And next I cut out some coral and attached the colored mermaid, turtle and clown fish. I actually have a whole bunch of items colored from that set and now that I have a card design I like, I can recreate this card pretty easily.

Supplies used: Stamps, MFT and Apple Blossom 

Cosmic Shimmer Pixie Powders: peacock green, emerald green, & aqua lagoon

Dies for the coral, Apple Blossom ( I fussy cut the mermaid, turtle and fish)

Embossing folder, SU

Stickles and Chameleon color tone pencils


Wishing you a “mermazing” day!

~Anna

Friday, July 28, 2017

Tim's Crazy Dogs

Hi All,
Hope you are enjoying your summer!

I've been having a ball with Tim Holtz's "Crazy Dogs" stamps and dies!!!

I had several different occasions to make cards; birthday, graduation, congratulations and even thank you and these fun dogs fit the bill for ALL of them!

Here they are:


Birthday card for Maria 


Graduation card for Mark


As you can see, the layout is the same for all of the cards.  I layered the pencil colored dogs on a piece of card stock that was embossed with the appropriate saying for the card.  Added some extras and most importantly added the sunglasses!!!  And don't forget to add glossy accents to the lenses to make them look shiny and like real lenses!

Hope you're having a great day and finding some time to craft!!!

Thanks for stopping by,
       ~Anna

Monday, August 15, 2016

Christmas Joy

Happy Monday!
Hope you are enjoying the summer and it's not too humid where you are!  We've been having a heat wave and the humidity has been horrible!  I don't remember when it was this bad.  Yesterday was better and I think it will improve slowly.  (I can't complain too much though, since I do hate the winter cold and snow!)

So, thinking about winter, I'd like to share with you a Christmas card I made and used in a class this past weekend.  I got the inspiration from Sue Wilson, the designer of the Joy die!  I saw the card she made with this die and I just fell in love with this color scheme; cream and gold is such an elegant look!  You can see Sue's creation HERE.

Sue Wilson's cards are actually beautiful pieces of art because she makes the cards quite large; usually 5X5 or 6X6.  My card is a regular A2 size card.  I didn't have a large nativity star die and so I went with the bells.  I also added micro-fine glitter to the edges and lots of stickles to the "snow" on the card.  I am really pleased with the way it turned out.


Now, Kittie Caracciolo is another talented designer and if you go to HER BLOG, you can see this die set used in the traditional red and green color scheme; very simple, yet also elegant.

This die was released in the winter of 2014, (and I finally used it! Yay!) I am happy to inform you that it is still available!  Please let me know if you want to reserve it for yourself!

Supplies used:
Dies:    Sue Wilson, Joy, Impression Obsession small Christmas charms, and small pine branches
Other:  Sizzix/Hero Arts "Snow" embossing folder, Micro fine glitter in Sahara, stickles

Thanks so much for stopping by,
       ~Anna

Friday, August 12, 2016

Beautiful Rose Border

Happy Friday!
Today I want to share with you a new card I made with the new "Rose Border" die from Frantic Stamper.  When I saw the die, I couldn't wait to get!!! And I just received it this week and here is my sample!


A very simple card, but still very pretty and elegant!  In addition, it is pretty quick to make!  The only tricky part is paper piecing the green leaves in the correct area.

This card will be part of the Roses Card class that will be scheduled for next month!

Supplies Used:

Dies:      Frantic Stamper, Rose Border
Punch:    Nelli Snellen rose leaves punch and embosser
Stamp:   Hero Arts

Thanks so much for stopping by,
           ~Anna

Friday, May 22, 2015

Happy Birthday with Gold Leafing

Happy Friday!

Today I want to share with you a simple birthday card with gold leafing for the background.


I know we had tried gold leafing years ago and sort of put it on the back burner.  Then I saw Sue Wilson using it with her dies and I said, OK, it's time to pull it out and use it again!!!

Actually, I COULDN'T find where I stashed it and so I had to re-order a container - LOL!!!  (OK, stop laughing because I KNOW you can relate!!!!)

It is so simple to use; I used the Be Creative tape and sprinkled some on and then just started to rub it in with my finger(s).  I forgot what an elegant look it gives!

And that's it!  QUICK and SIMPLE!  Love those cards!!!

Supplies used:
Dies:  Happy Birthday edge by Joy Crafts
Embossing folder:  A4 size (8 1/4" X 12") Dots embossing folder
Other: Calypso - Cosmic Shimmer Gilding Flakes

Thanks so much for stopping by and Have a wonderful and safe holiday weekend!
                                         ~Anna


Thursday, January 22, 2015

His and Her Get Well Cards!

As promised, more get well cards for you!

I really liked how this card came out.  It's clean, simple and puts a smile on my face! And hopefully, it will put a smile on the patient's face.


The only thing that started to bother me was that it does look a bit feminine.  Of course, that is only natural because I'm a woman who likes pretty colors, hearts and flowers and I am drawn to replicate that in my work!  The next day though, these thoughts were still swirling around in the back of my mind when the idea of stars came to me.  What about changing out the hearts for stars and changing the color combo.   And so, my mind began to race and I couldn't wait to get home and try it out.  (I just love it when an idea just pops into your head - and this all happened while I was driving on my lunch break!)  Here is the masculine version --- what do you think?

And here are the two cards, side by side ---

(Both cards are the same size - 3 1/2 X 5.  It's just an optical illusion that the white one looks bigger.)

Hope this gets your creative juices flowing!
                    ~Anna

Friday, October 24, 2014

A Clean and Simple Christmas Angel Card

I love angels and the Impression Obsession new angel die set makes two pretty angels perfect for Christmas cards.

The gold card stock makes this card very regal and yet the design is simple enough that you can mass produce it.

If you haven't started your Christmas cards, hope this gives you the inspiration to start!  Christmas will be here before we know it!!!

Supplies used:
Dies:  Impression Obsession angel set, Spellbinders floral ovals
Stamp:  Joy to the world
Embossing folder:  Joy crafts

Thanks so much for "stamping" by,
                    ~Anna

Saturday, October 11, 2014

A Simple Christmas Card

Happy Saturday!   Today I wanted to post a simple card I made using the Tattered Lace Kensington Corner die; and by placing it not in a corner, you get a nice, different look.

The deer is an Impression Obsession die and then I used Nellie's punches for the pine and flower for the deer's neck.  The finishing touch were some pearl dots made with a Viva Decor pearl pen.  It's simple so you can mass produce this one for Christmas!

Supplies used:
Stamps:  Merry Christmas (unknown) and heat embossed in white
Dies:      Tattered Lace Kensington corner, Impression Obsession large deer set
Punches: Nellie Snellen mini flower & butterfly set, pine branch
Other:     Viva Decor pearl pen

Thanks for "stamping" by,
               ~Anna


Sunday, October 5, 2014

Modern Christmas Cards - One Design, Three Different Colors

Good Day Everyone!

First I would like to thank everyone for being so supportive and patient with me.  .My personal life schedule has changed and I have been working hard to get everything to fall into place, especially with the Creative Corner.  Again, thank you for being here and patiently waiting for my blog posts and the updates on The Creative Corner!  I truly appreciate it.

We had a wonderful Make and Take yesterday and I have to say everyone liked their unique and untraditional jade color Christmas card.  Here is what we made:
I just love these Hero Arts stamps and have had them for such a long.  I finally got around to create these cards.

As you know, I have been in love with the color teal over the summer and I wanted to use it here.  I used Brilliance Pearlescent Jade and it gives the card a very pretty shimmer.

So, yesterday, we had some really dedicated stampers for the Make & Take!!!  Unfortunately, we lost power for a short time, but Charlene and Jamie wanted to make their cards and so they worked in the dark!!!  Now, that's dedication!

The pictures really don't show how dark it got because of the flash from the camera.  But you can see that we had candles, a flashlight shining onto the work table and Gladys holding her iPhone with the flashlight app!  Thankfully, the outage was not for long and those who came later were able to work in light!


After everyone left, I decided to see how the beautiful stamps would look in different Brilliance colors.  Now,I don't know which one I like best - they all look great!  What do you think?


Supplies used:
Stamps:  Hero Arts, Winter Moon and Many Branches Tree
Dies:  Impression Obsession, Set of tiny birds and Small deer set
Ink:  Tsukineko Brilliance Pearlescent Jade, Lavender, and Coral, Versacolor evergreen, Marvey  matchables violet, Memento rose bud
Glitter:  Micro fine glitter, deep purple, silver and ocean spray


Thanks so much for stopping by
             ~Anna

Saturday, June 7, 2014

Father's Day Make & Take

Just a quick post of the card we will create in today's Make & Take!  Perfect for Father's Day.........or a "guy" card for any occasion.


In addition, learn the basics of Pinterest during today's presentation and join this fun group that is the fasting growing social media on the net today!!! Even faster than Facebook and Twitter!

Looking forward to seeing you,
          ~Anna

Saturday, April 26, 2014

Another 3-D Pop Up Card in a Box!

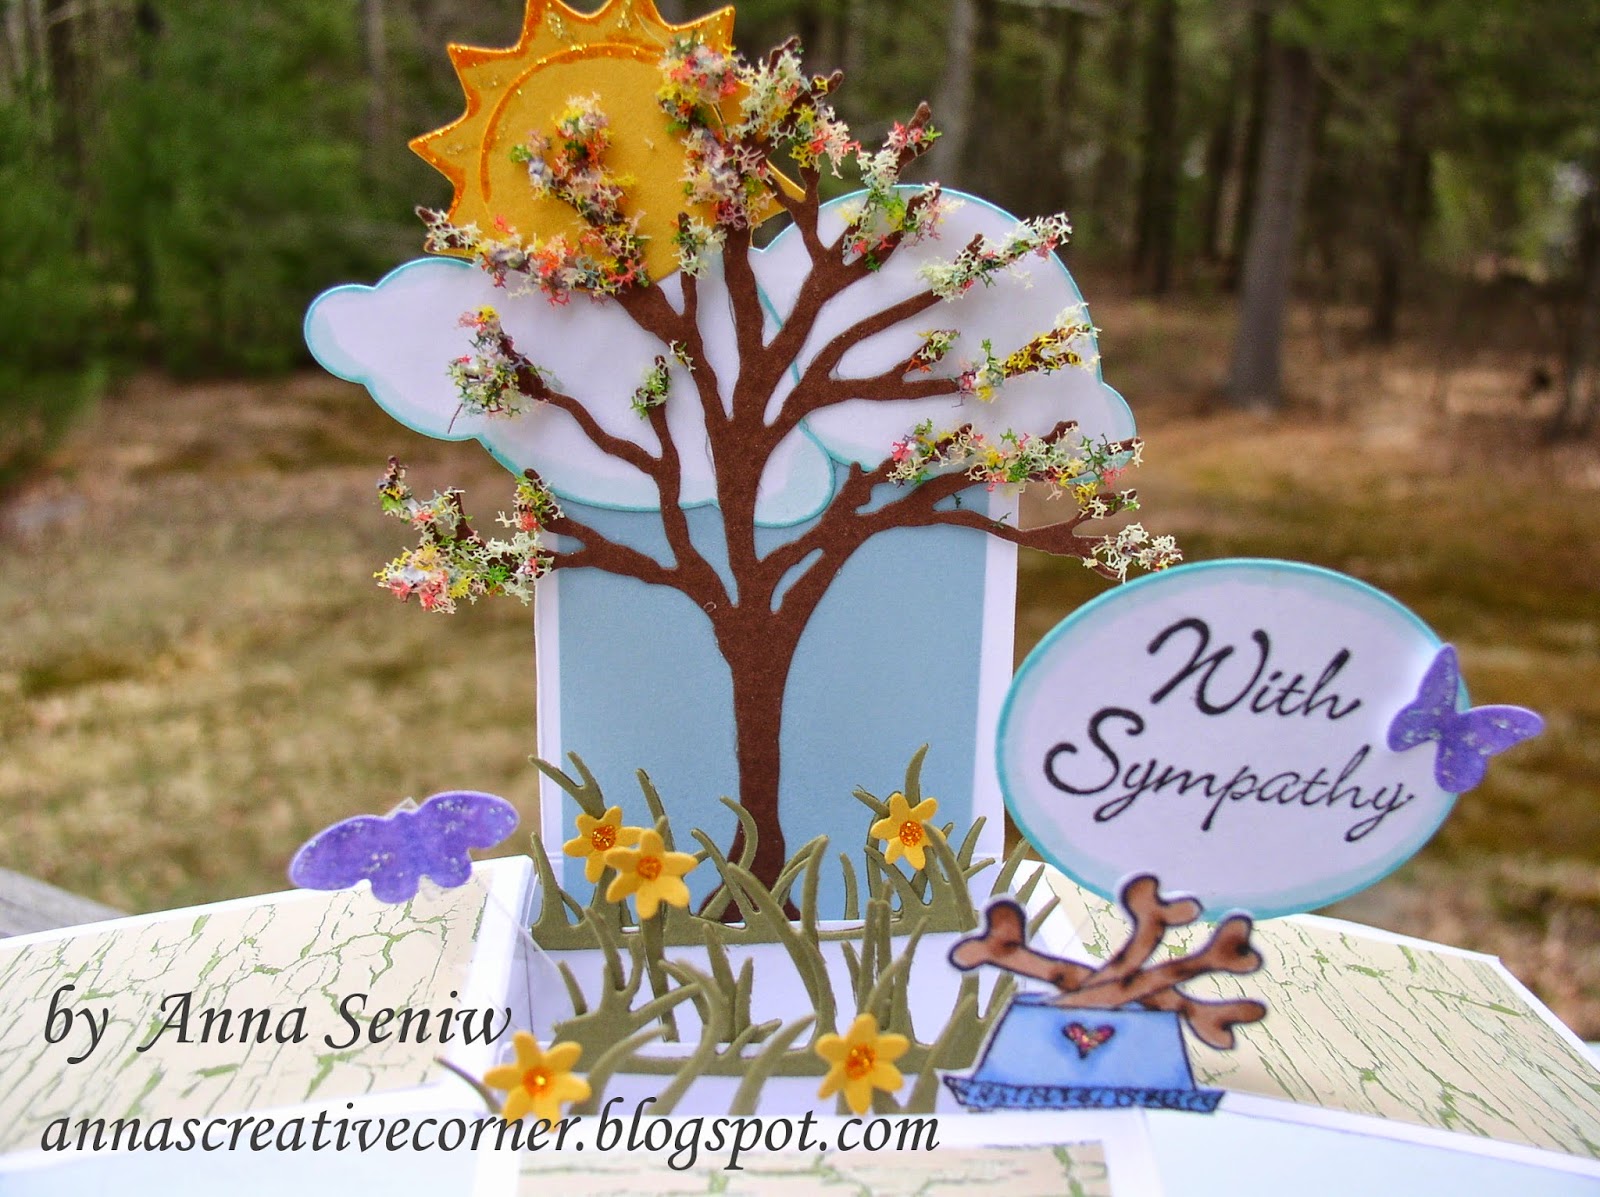
My good friend Maryanne lost her beloved dog recently and I wanted to create something special for her. I decided on a card in a box and presented it to her yesterday.  She was very surprised and so sweet by promising to display and keep this card by Teddy's urn.


I truly enjoyed making this scene in the box; it was a lot of fun picking the various components and watching it all come together.  These 3-D scenes are addicting!

If you are curious how to make these 3-D pop up cards in a box, please join us on Saturday, May 17 and create 2 such great cards!  These are so very popular now; don't miss out on the chance to learn how to create them!  Please call and reserve your seat today!  You will not be disappointed.

Supplies used:
Dies:  Impression Obsession bare tree, clouds, sun & moon set, butterfly set, & tiny flowers set
Cheery Lynn grass border, Spellbinders classic ovals and labels 4
Stamps: Impression Obsession sympathy sentiments cling set
Other:  Copic markers, Flower Soft, & stickles

Hope you have a wonderful weekend,
               ~Anna

Monday, March 24, 2014

Really Nice Dress Form Cards from Shannon Maino

Hi Everyone!
Shannon showed me these great cards that she made with the Die Versions Dress Form die.  The layout is very pretty, girly and simple but make a big impression. 


Here are close up of the cards:


As you can see, the fold of the card is off center and gives some interest plus the black sparkly card stock gives it a really nice sparkle.

Here is a picture of the die set.  Please let me know if you would like to order the set.


Thanks so much Shannon for sharing!
And thank you for "stamping" by,
             ~Anna

Sunday, February 23, 2014

Great Masculine Birthday Card with Little Deer!

Hello Everyone!
I just wanted to share with you a great card that Soni Larson made for her son!  I just love it!


As I said before, these deer dies have become so very popular and for good reason.  We used them on Christmas cards and they make great masculine nature themed cards.

Supplies used: 

Dies:  Impression Obsession small deer set, Impression Obsession fir trees and fir tree border,
          Spellbinders classic nesting ovals
Embossing folder:  Sizzix snow
Card stock:  Soni used some special pre-embossed "bark" card stock and "wood" card stock for the deer

Thanks for "stamping" by,
         ~Anna

Wednesday, October 9, 2013

A Snowy Wintry Forest Scene

Tags, tags and another tag!  I had fun creating this wintry scene tag and the birch trees die and the deer trio from Impression Obsession were perfect for the task. 

I used distress ink and copics to add color and stickles put the finishing sparkly touch to the project!

Get into the fun and create some tags!
Have a wonderful day!
        ~Anna

Supplies used:
Dies:  Impression Obsession Birch trees (comes with 2 birds), Impression Obsession Deer trio
Embossing folder:  Sizzix
Copics:  Cool grays, browns, reds
Distress ink:  Antique linen
Other:  Nellie Snellen Duo punch of tiny flower & butterfly, stickles

Wednesday, October 2, 2013

Wine Bottle Tag

Happy Wednesday!
Today I want to share with you a tag I made for a wine bottle.   Being of Ukrainian descent, wheat is used so much in our culture and so when I saw the new wheat die from Impression Obsession, I knew I had to have it.  The die cuts beautifully and the die cut itself is so delicate.  I went to work to make a wine bottle tag so that I could be ready for Thanksgiving.


I just love the way it turned out; simple, to the point and dresses up the bottle.

This tag is also in the collection of tags that you can create in our "Tag You're It" class.  This class is being offered 2 times (so far); Saturday, Oct 5 at 1PM and on Thurs, Oct 17 at 11AM.  Call to reserve your seat today!

Have a wonderful day
and looking forward to seeing you soon!
             ~Anna

Tuesday, September 24, 2013

"Pergamano" Snowflake

Today, as promised, I am sharing a "Pergamano" snowflake gift card.  Whenever you dry emboss on vellum, you get the white lines.  I used parchment vellum here, which is of thicker weight than vellum, cut out a window and added some peel offs.  Again, quick an easy.


Hope you'll join us for this special Pergamano Make and Take on Saturday, Oct 5 from 11AM - 1PM.
Now is the time to start thinking about your fall and Christmas projects.  And don't forget Chanukah, which is very early this year - starts Nov 28! 

Thanks for "stamping" by,
        ~Anna

Thursday, August 8, 2013

Look at these NEW fabulous dies from Dee!

Oh my. where do I begin!???

Dee has released her new dies and they are just jaw dropping spectacular!

First, here is the new floral collection..............................I just love the little bells!
                  These are the dies:


                         And here are the flowers all put together!

                                                                       Simply gorgeous!


Here are some pretty Asian and tropical influence designs:


AND LAST BUT NOT LEAST!!!
                                   Build a Christmas Tree collection!  What a grand idea!
I know many of you have the Christmas trees from last year!  Well, now you can add DECORATIONS to your trees! And it will be so easy.  The decorations come in sets.  For example, you will get a die plate with LOTS of mini Xmas balls, so that you will cut 40 balls with ONE pass through of your die cutting machine!  Or you will cut 28 stars or 14 mini doves!  What a time saver!

Don't know about you, but my mind is spinning!

Let me know what you think!  And please let me know if you want any of these................I want to make sure that I order enough and no one will be disappointed!  (Also, the actual Christmas tree dies are also available if you want to add one to your collection.)

Have a fabulous day!
        ~Anna

Sunday, June 16, 2013

Happy Father's Day!

Happy Father's Day everyone! Anyone can be a father, but it takes someone special to be a dad!  Wish my dad lived closer, but we talk everyday and I'm wishing him a wonderful day. 

Just wanted to post a quick and easy card for Father's Day.


Wanted to show you a close up of the saying.

Thanks for stopping by and I hope you are having a great day with your dad!
              ~Anna

Monday, June 10, 2013

Cards from the "To Distress or Not" Class

First I would like to thank everyone who came to the class and helped make it such a success!  We created, caught up with news and laughed all afternoon.  What more could we have asked for?  Too bad that Korkie and Jan weren't feeling well and did not make the trip up.  We missed you both!   I also have to say that I missed Jan's cute British accent.  Hope you are feeling better and looking forward to see you soon!

I also want to thank Barbara for teaching and bringing the vintage and distress look to us again.  You really made everyone think outside the box!

Here are the cards we made:
These are the 3 cards with the distressed look.

And these are the non-distressed cards (I guess we can call  them the clean cards).

Next, are pictures of the cards side by side.  We basically used the same design layout and the same supplies, and came up with two different looks!  It was just amazing!


Hope these samples get your creative juices flowing!

Thanks for stopping by!
         ~Anna

Wednesday, May 29, 2013

A Sympathy Card

Impression Obsession has a very nice saying stamp for sympathy cards and I used that stamp as the starting point for my card that I recently had to make for a fellow parishioner who lost her young husband. 


I made a frame with the Spellbinders Labels Two and stamped the saying inside of it.  I layered it on card stock that I embossed with the new embossing folder from Crafts-Too and then decorated around the frame with flowers and leaves.  The last touch was the Cheery Lynn butterfly and of course a bit of stickles strategically placed.  Oh yes, I also used Viva Decor pearl pens to make pearls for the centers of the flowers and the body of the butterfly.

You may be surprised that this is a sympathy card, but not all sympathy cards have to be of a dark color palette.  Dark colors sometimes make the card look a bit too sad and most of the time I try to stay away from them.  Hope this gives you some inspiration for these sometimes difficult cards to make.

Thanks for stopping by,
            and
Have a wonderful day
         ~Anna